Shamrock S’more Muffins

FullSizeRender (1)

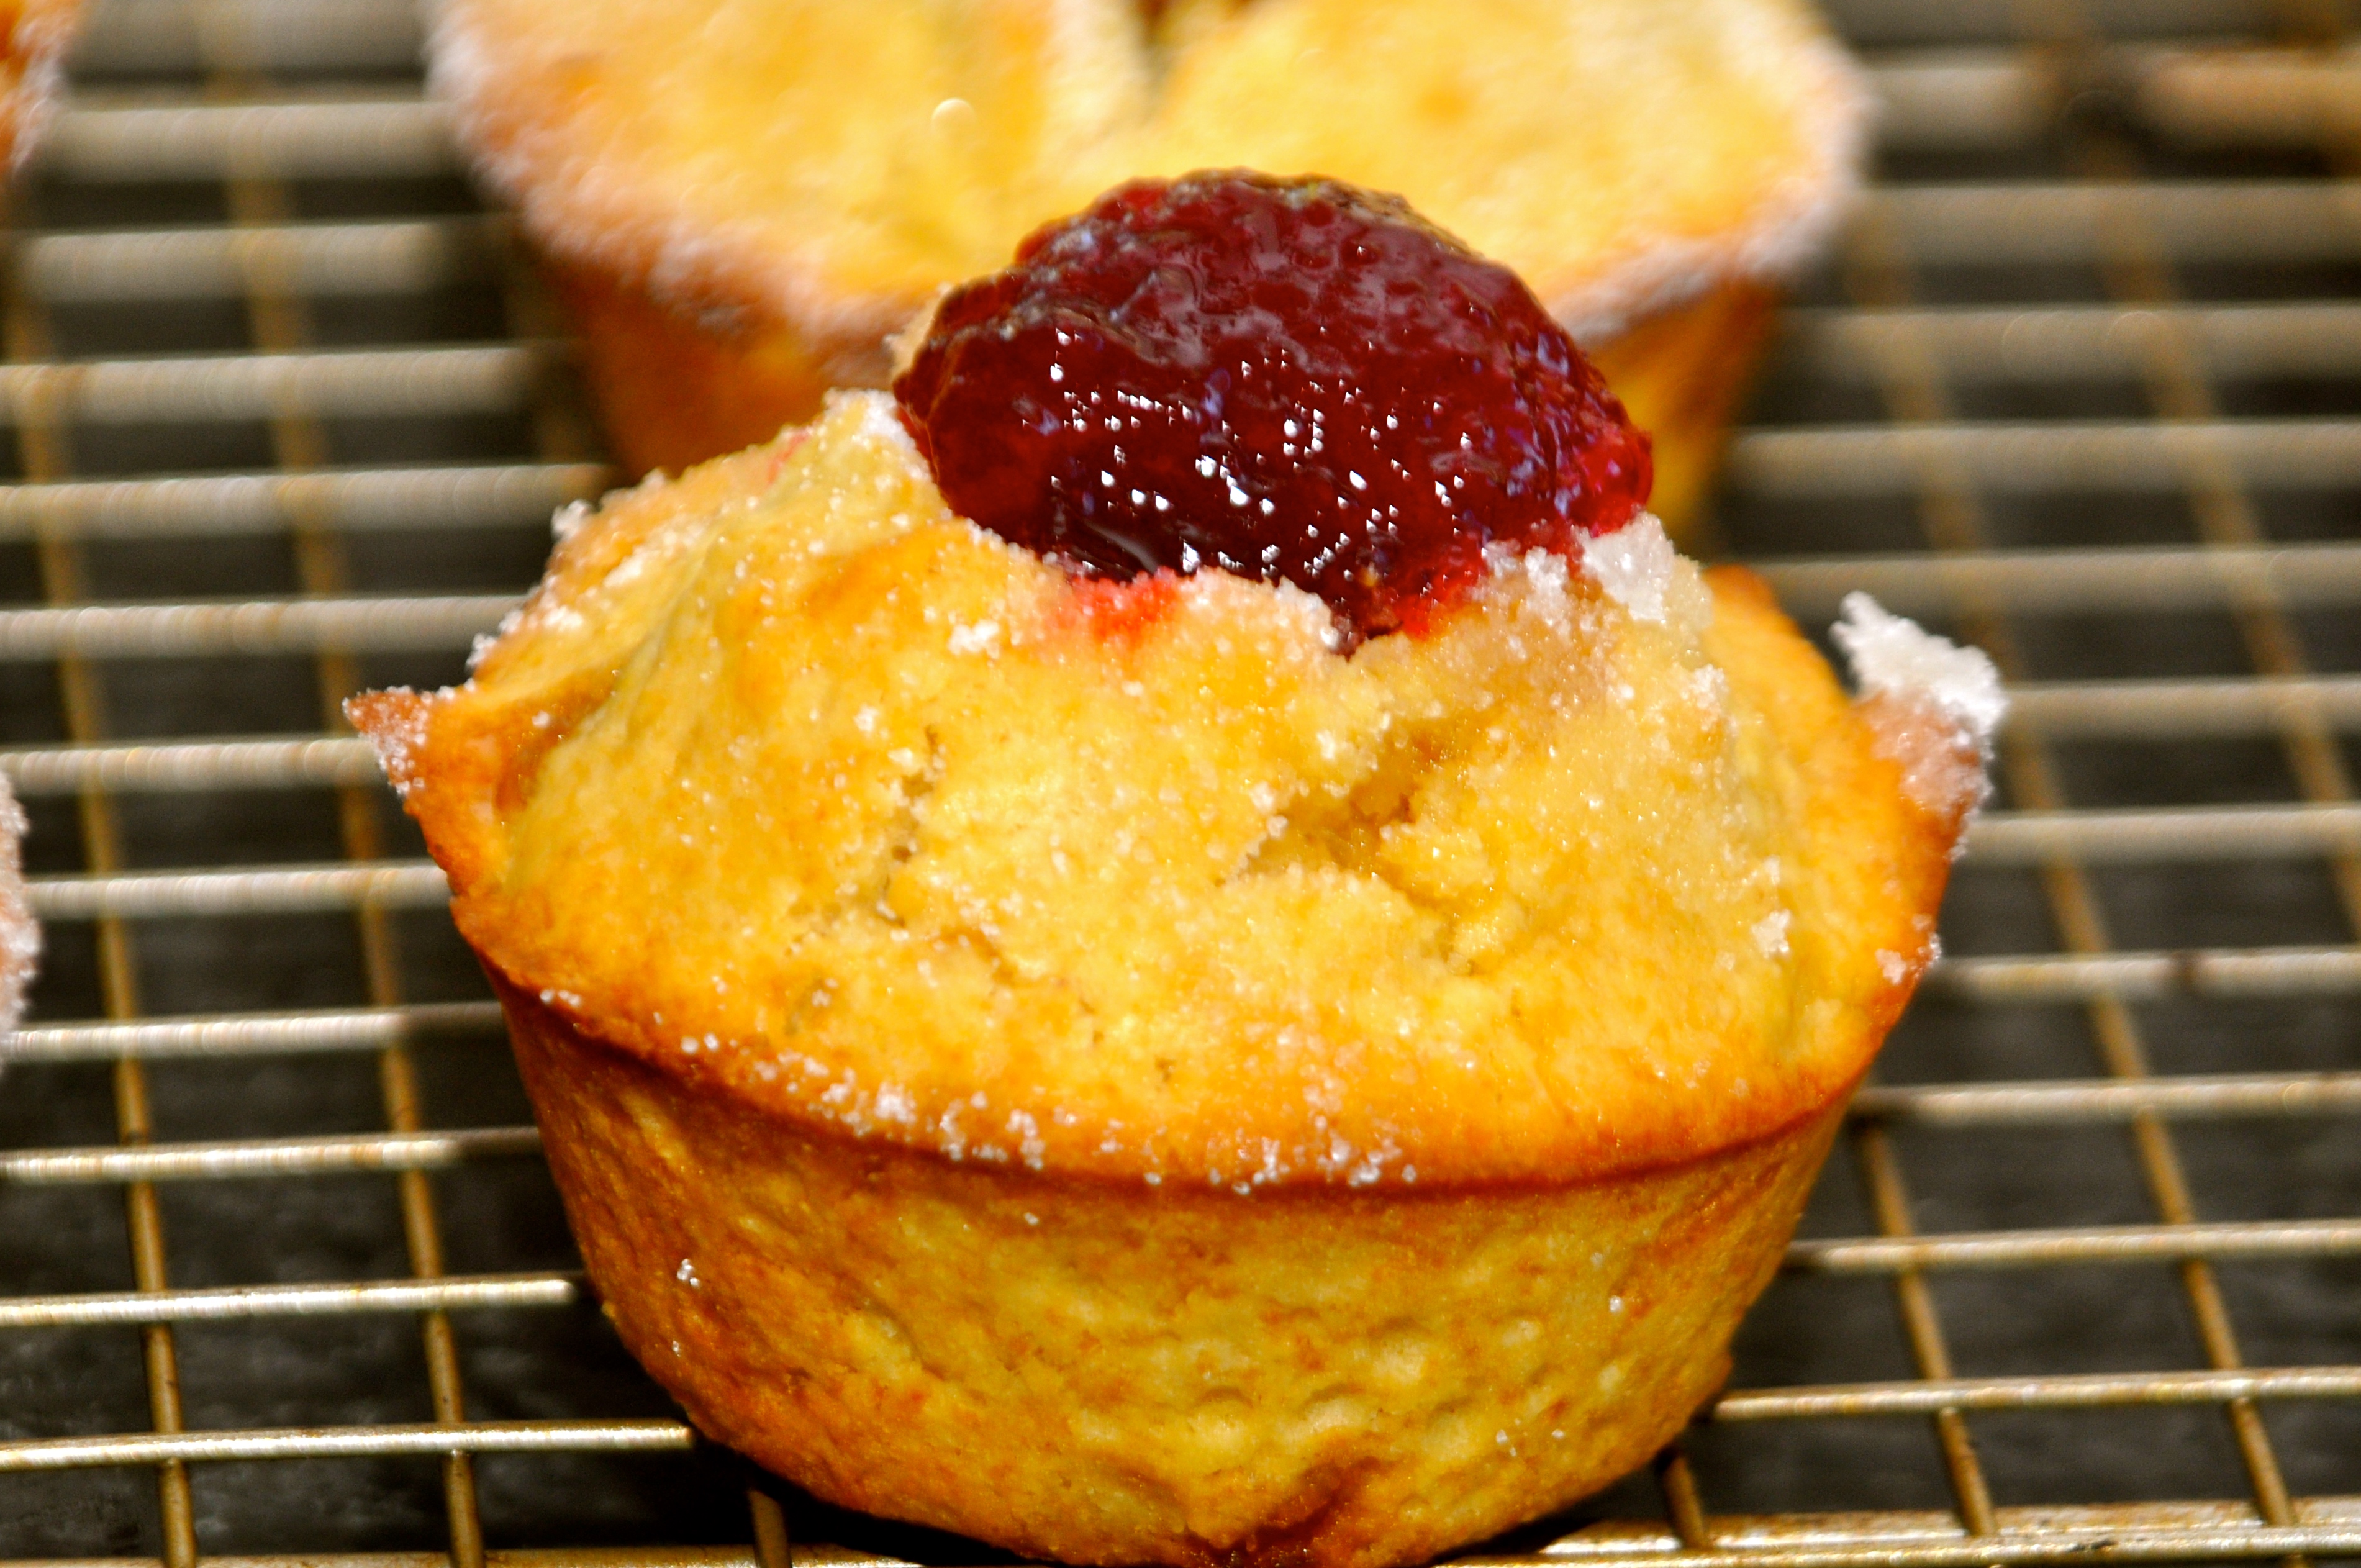
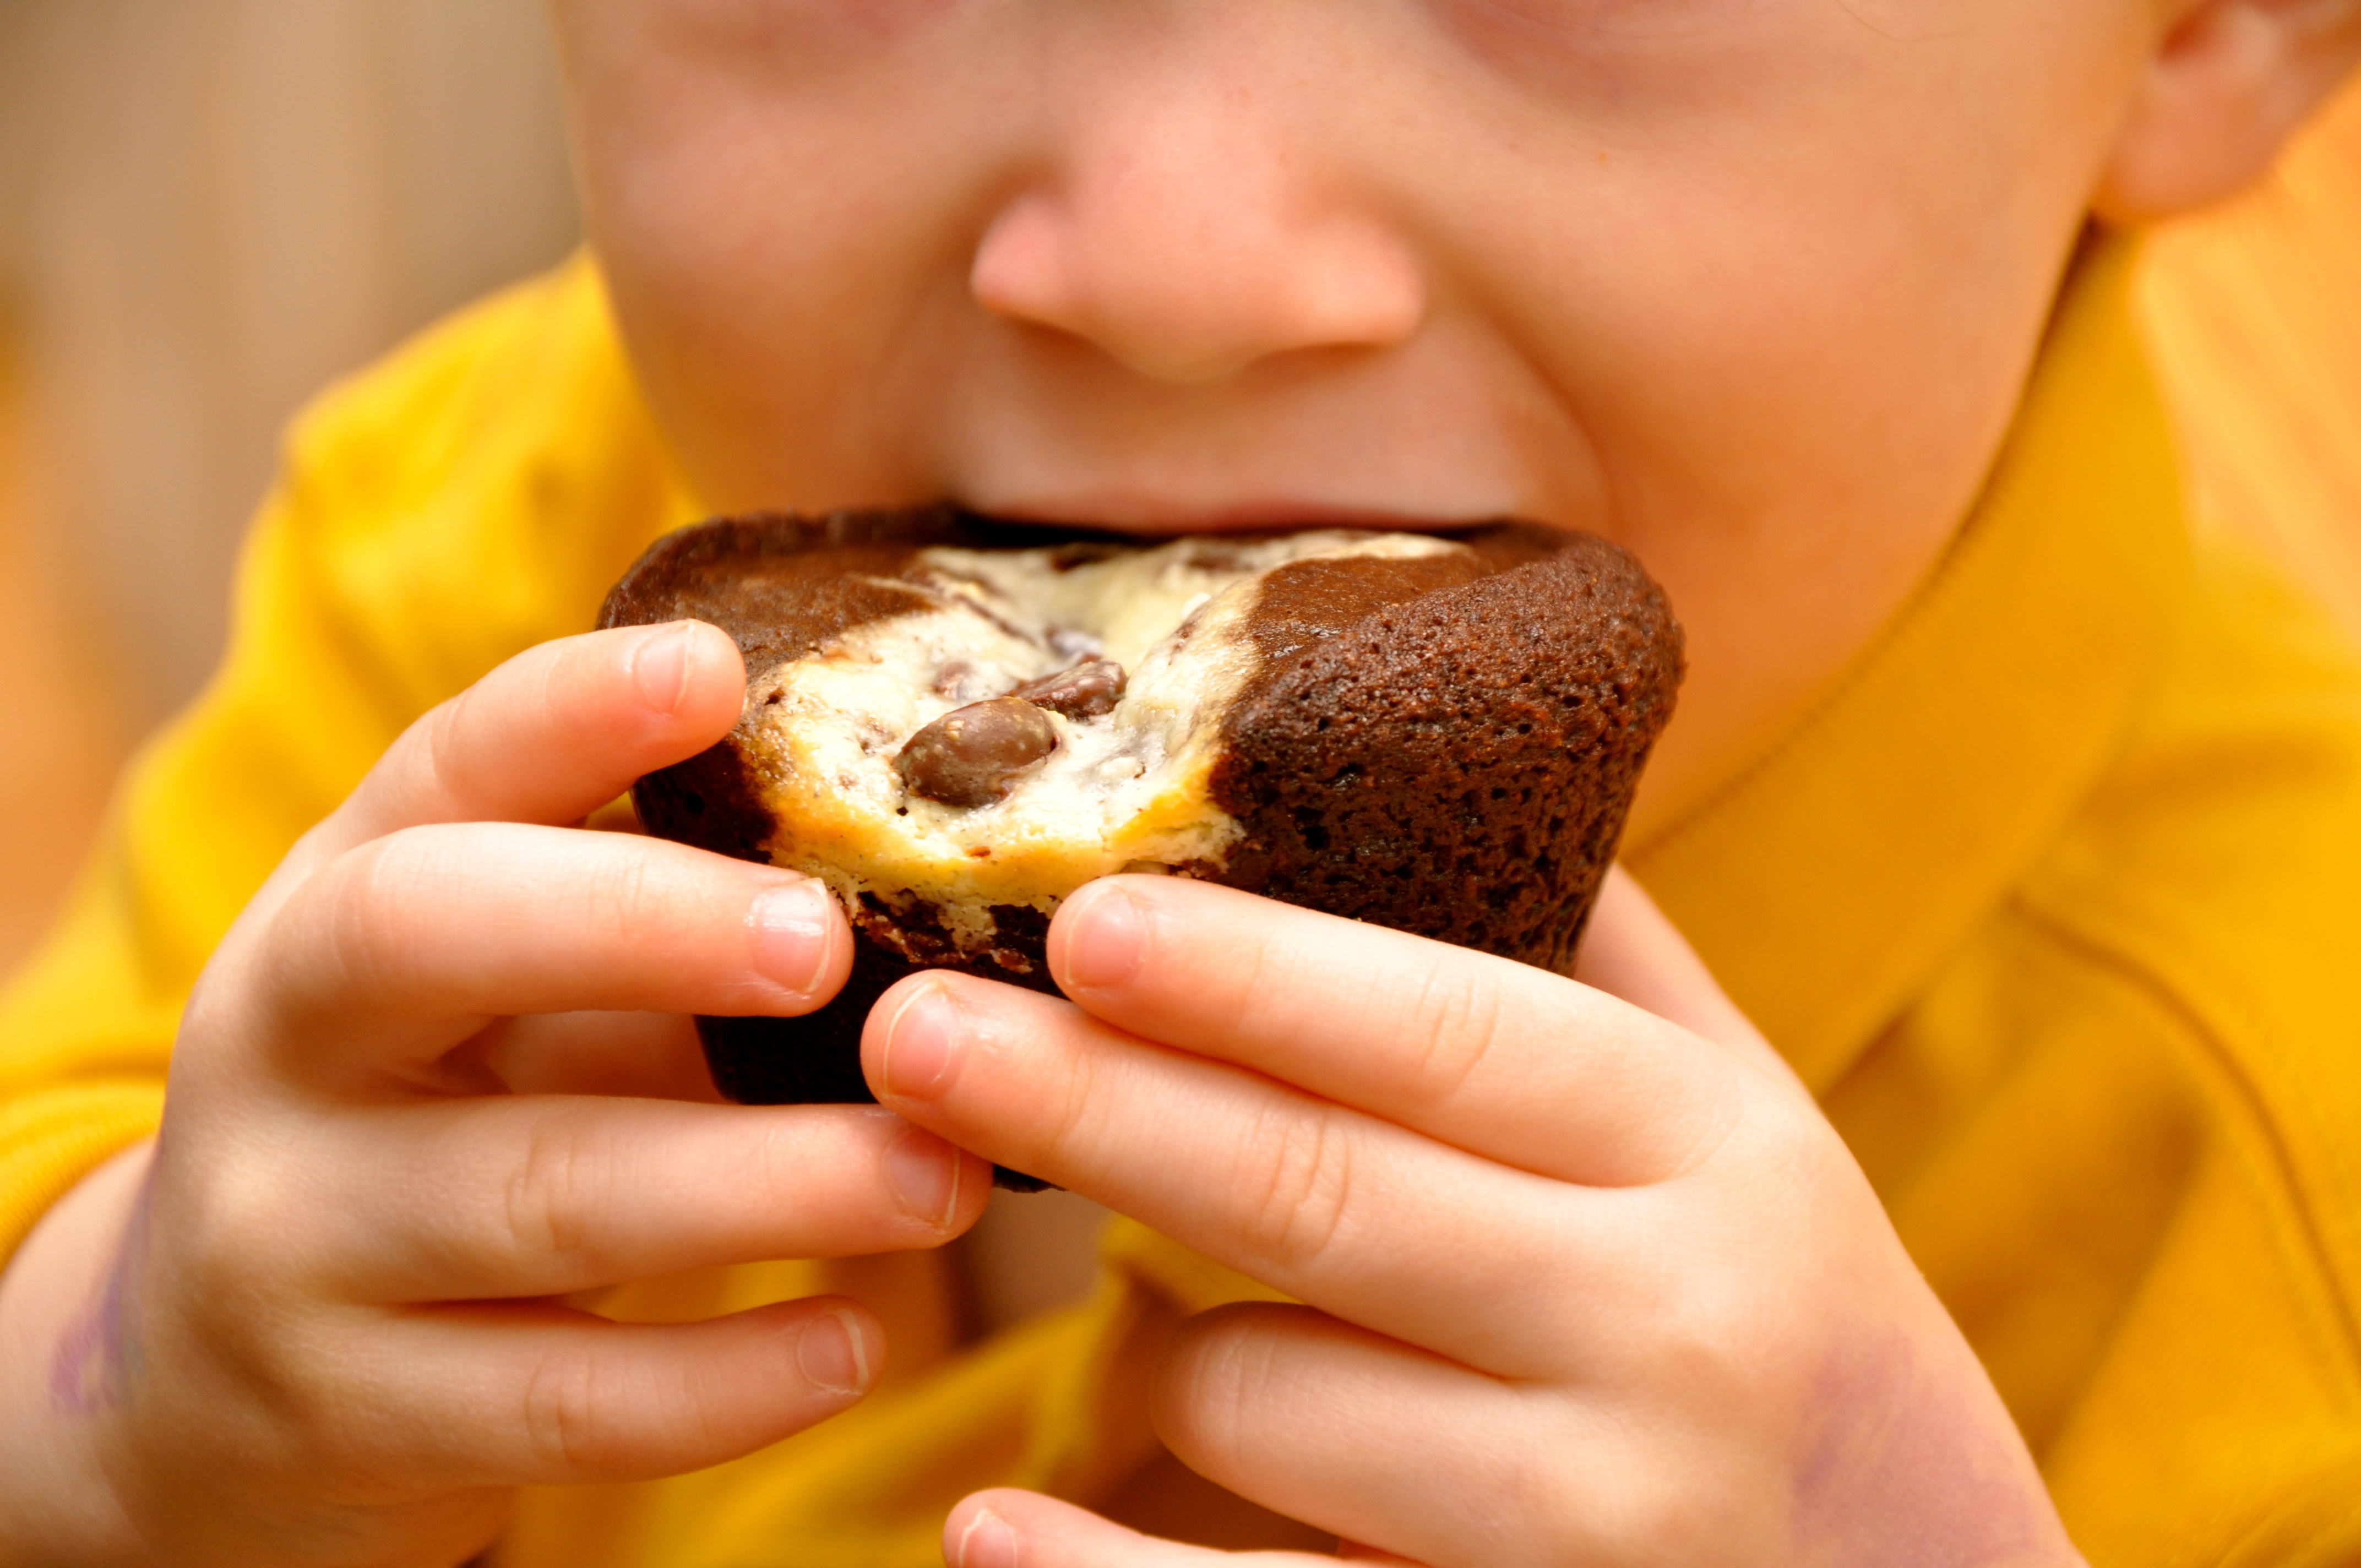
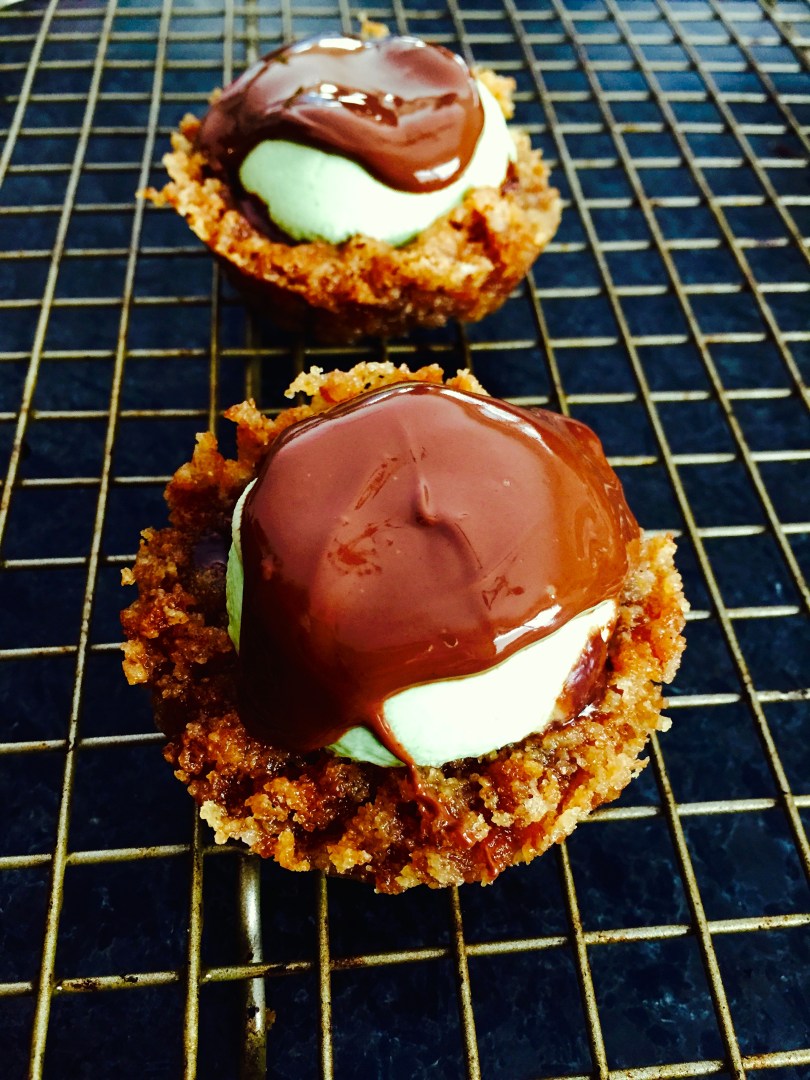
Ooey, gooey, and GREEN in honor of Saint Patrick’s Day, you’ll adore this batch so much you’ll want s’more. This fun twist on a classic dessert is like finding a pot of edible gold.

S’mores (the Girl Scout concoction of roasted marshmallow with melted chocolate sandwiched between two pieces of graham crackers) is one part of camping you can re-create in your kitchen without the packing, unpacking, and mosquitos.

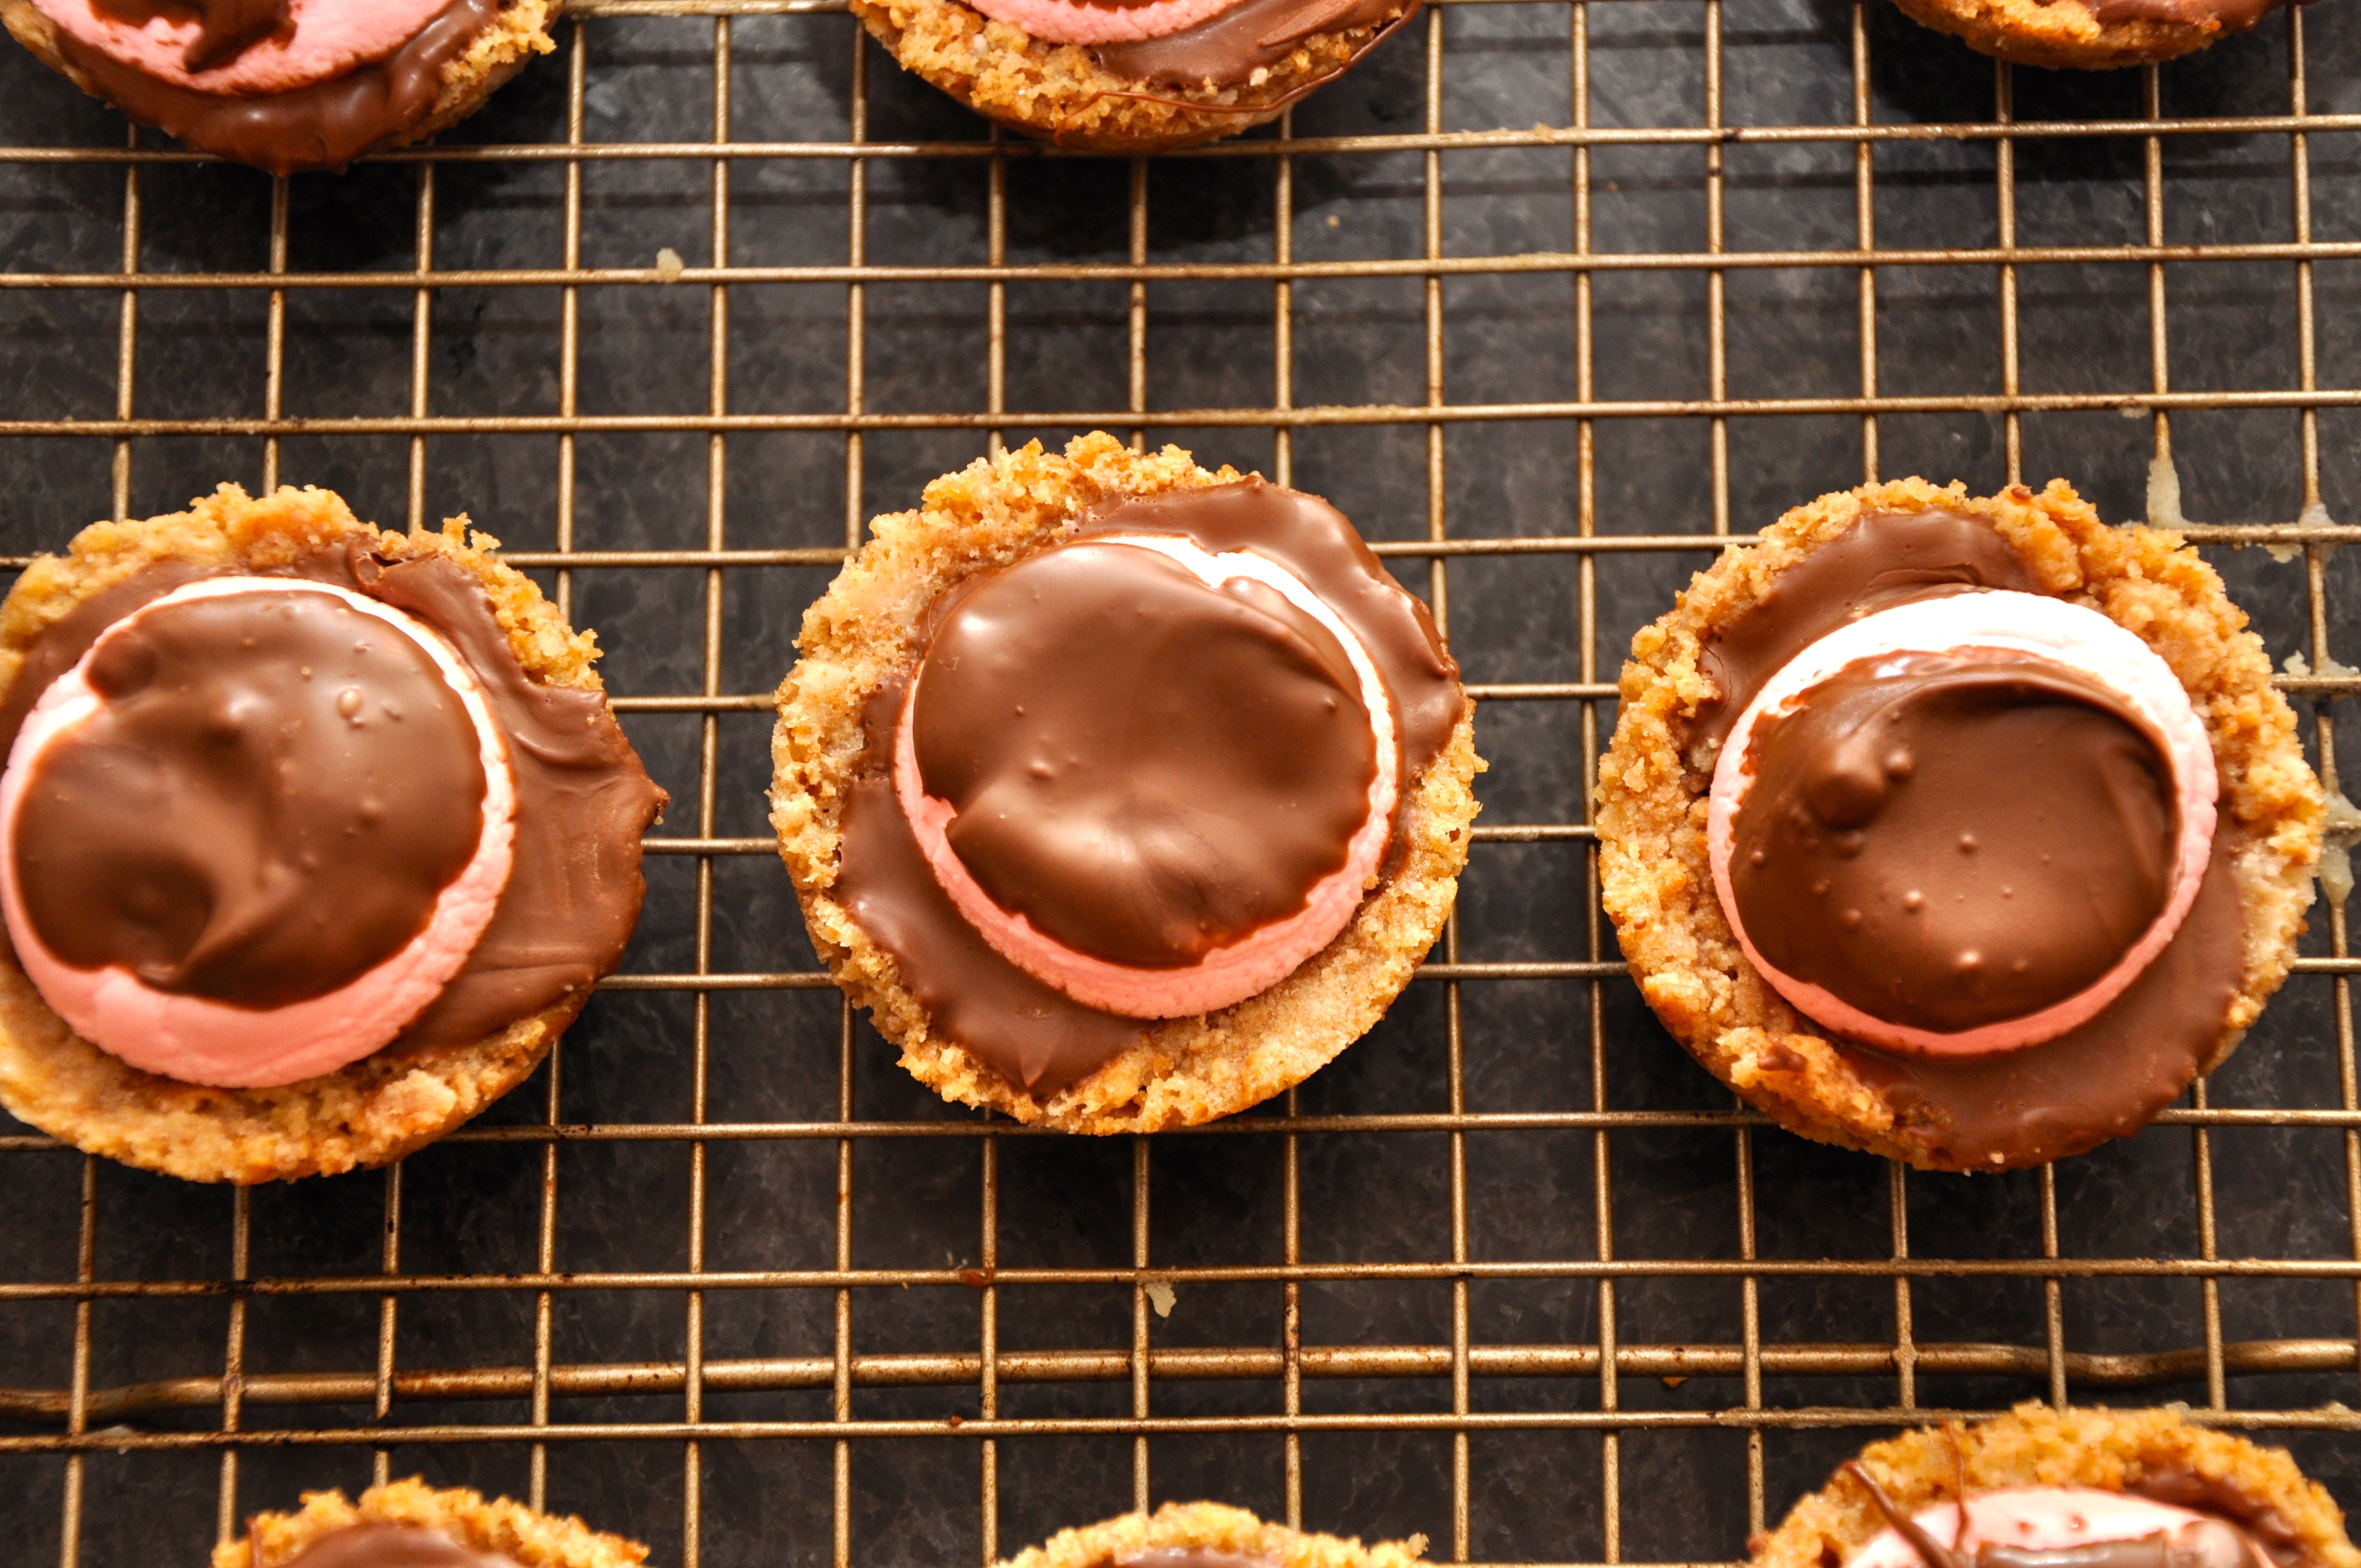
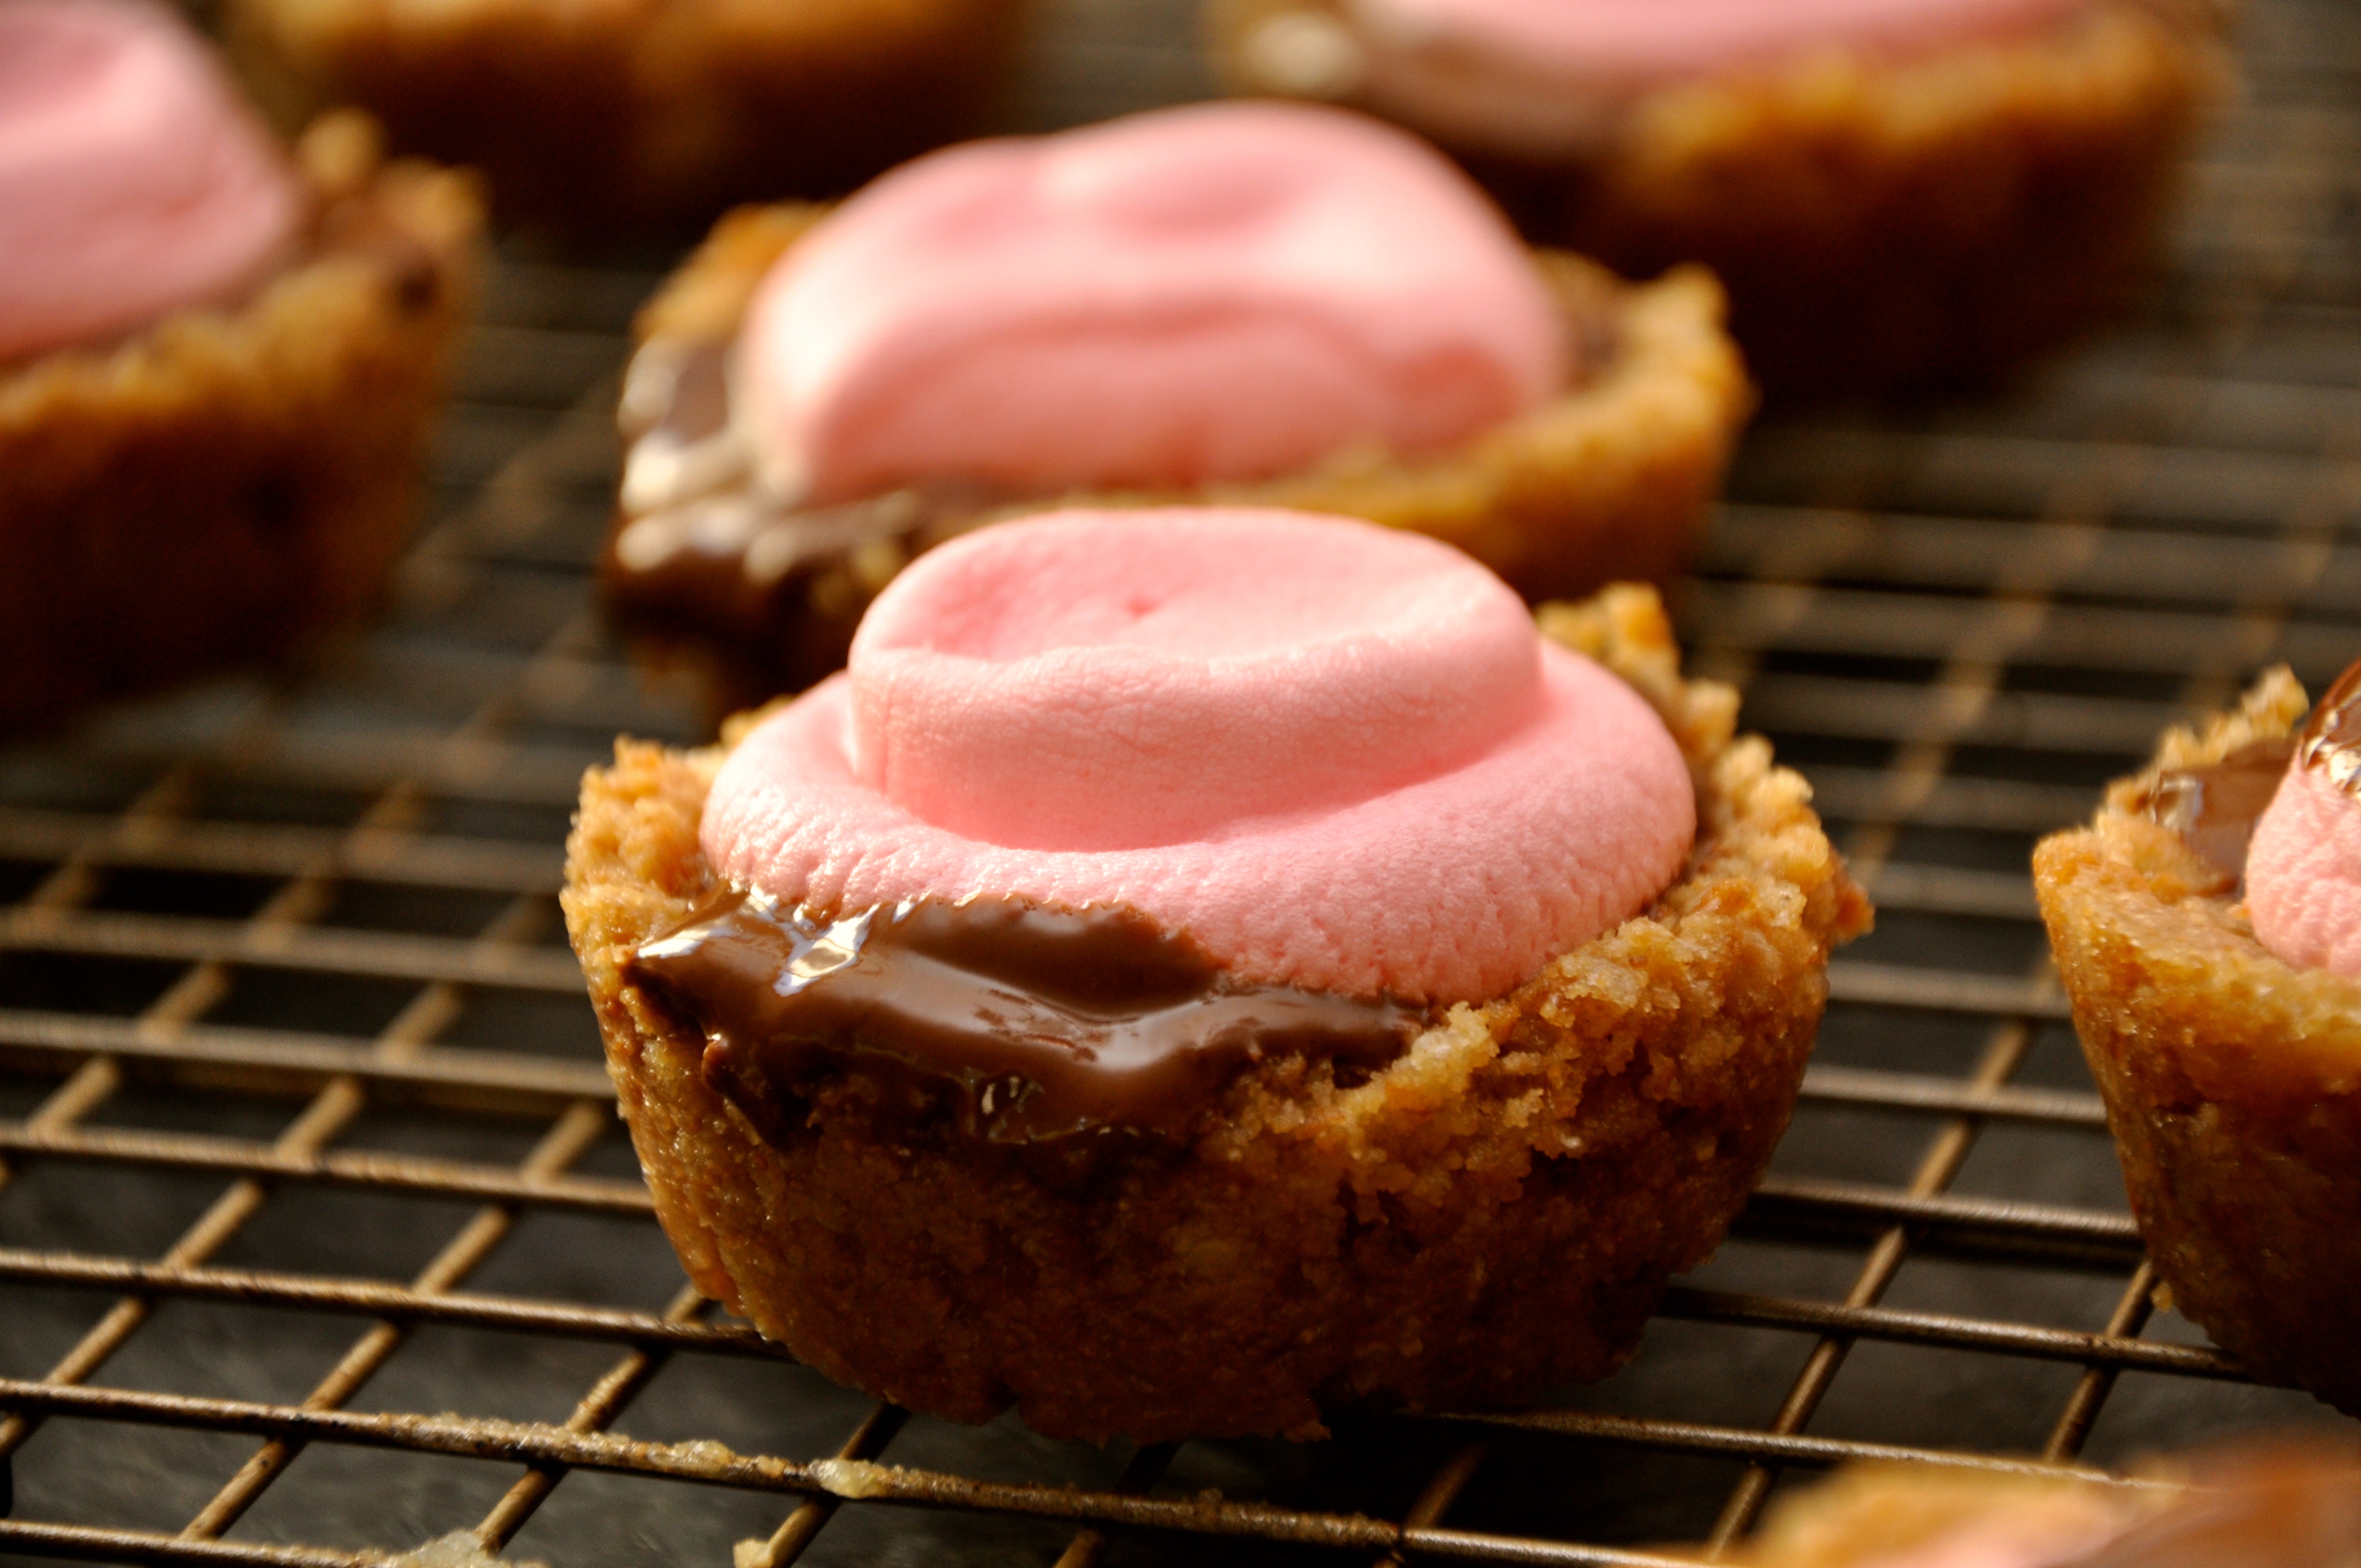
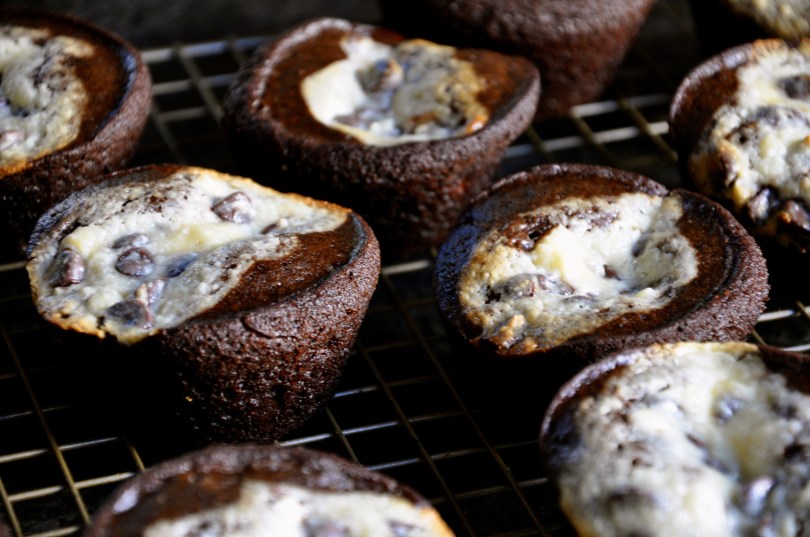
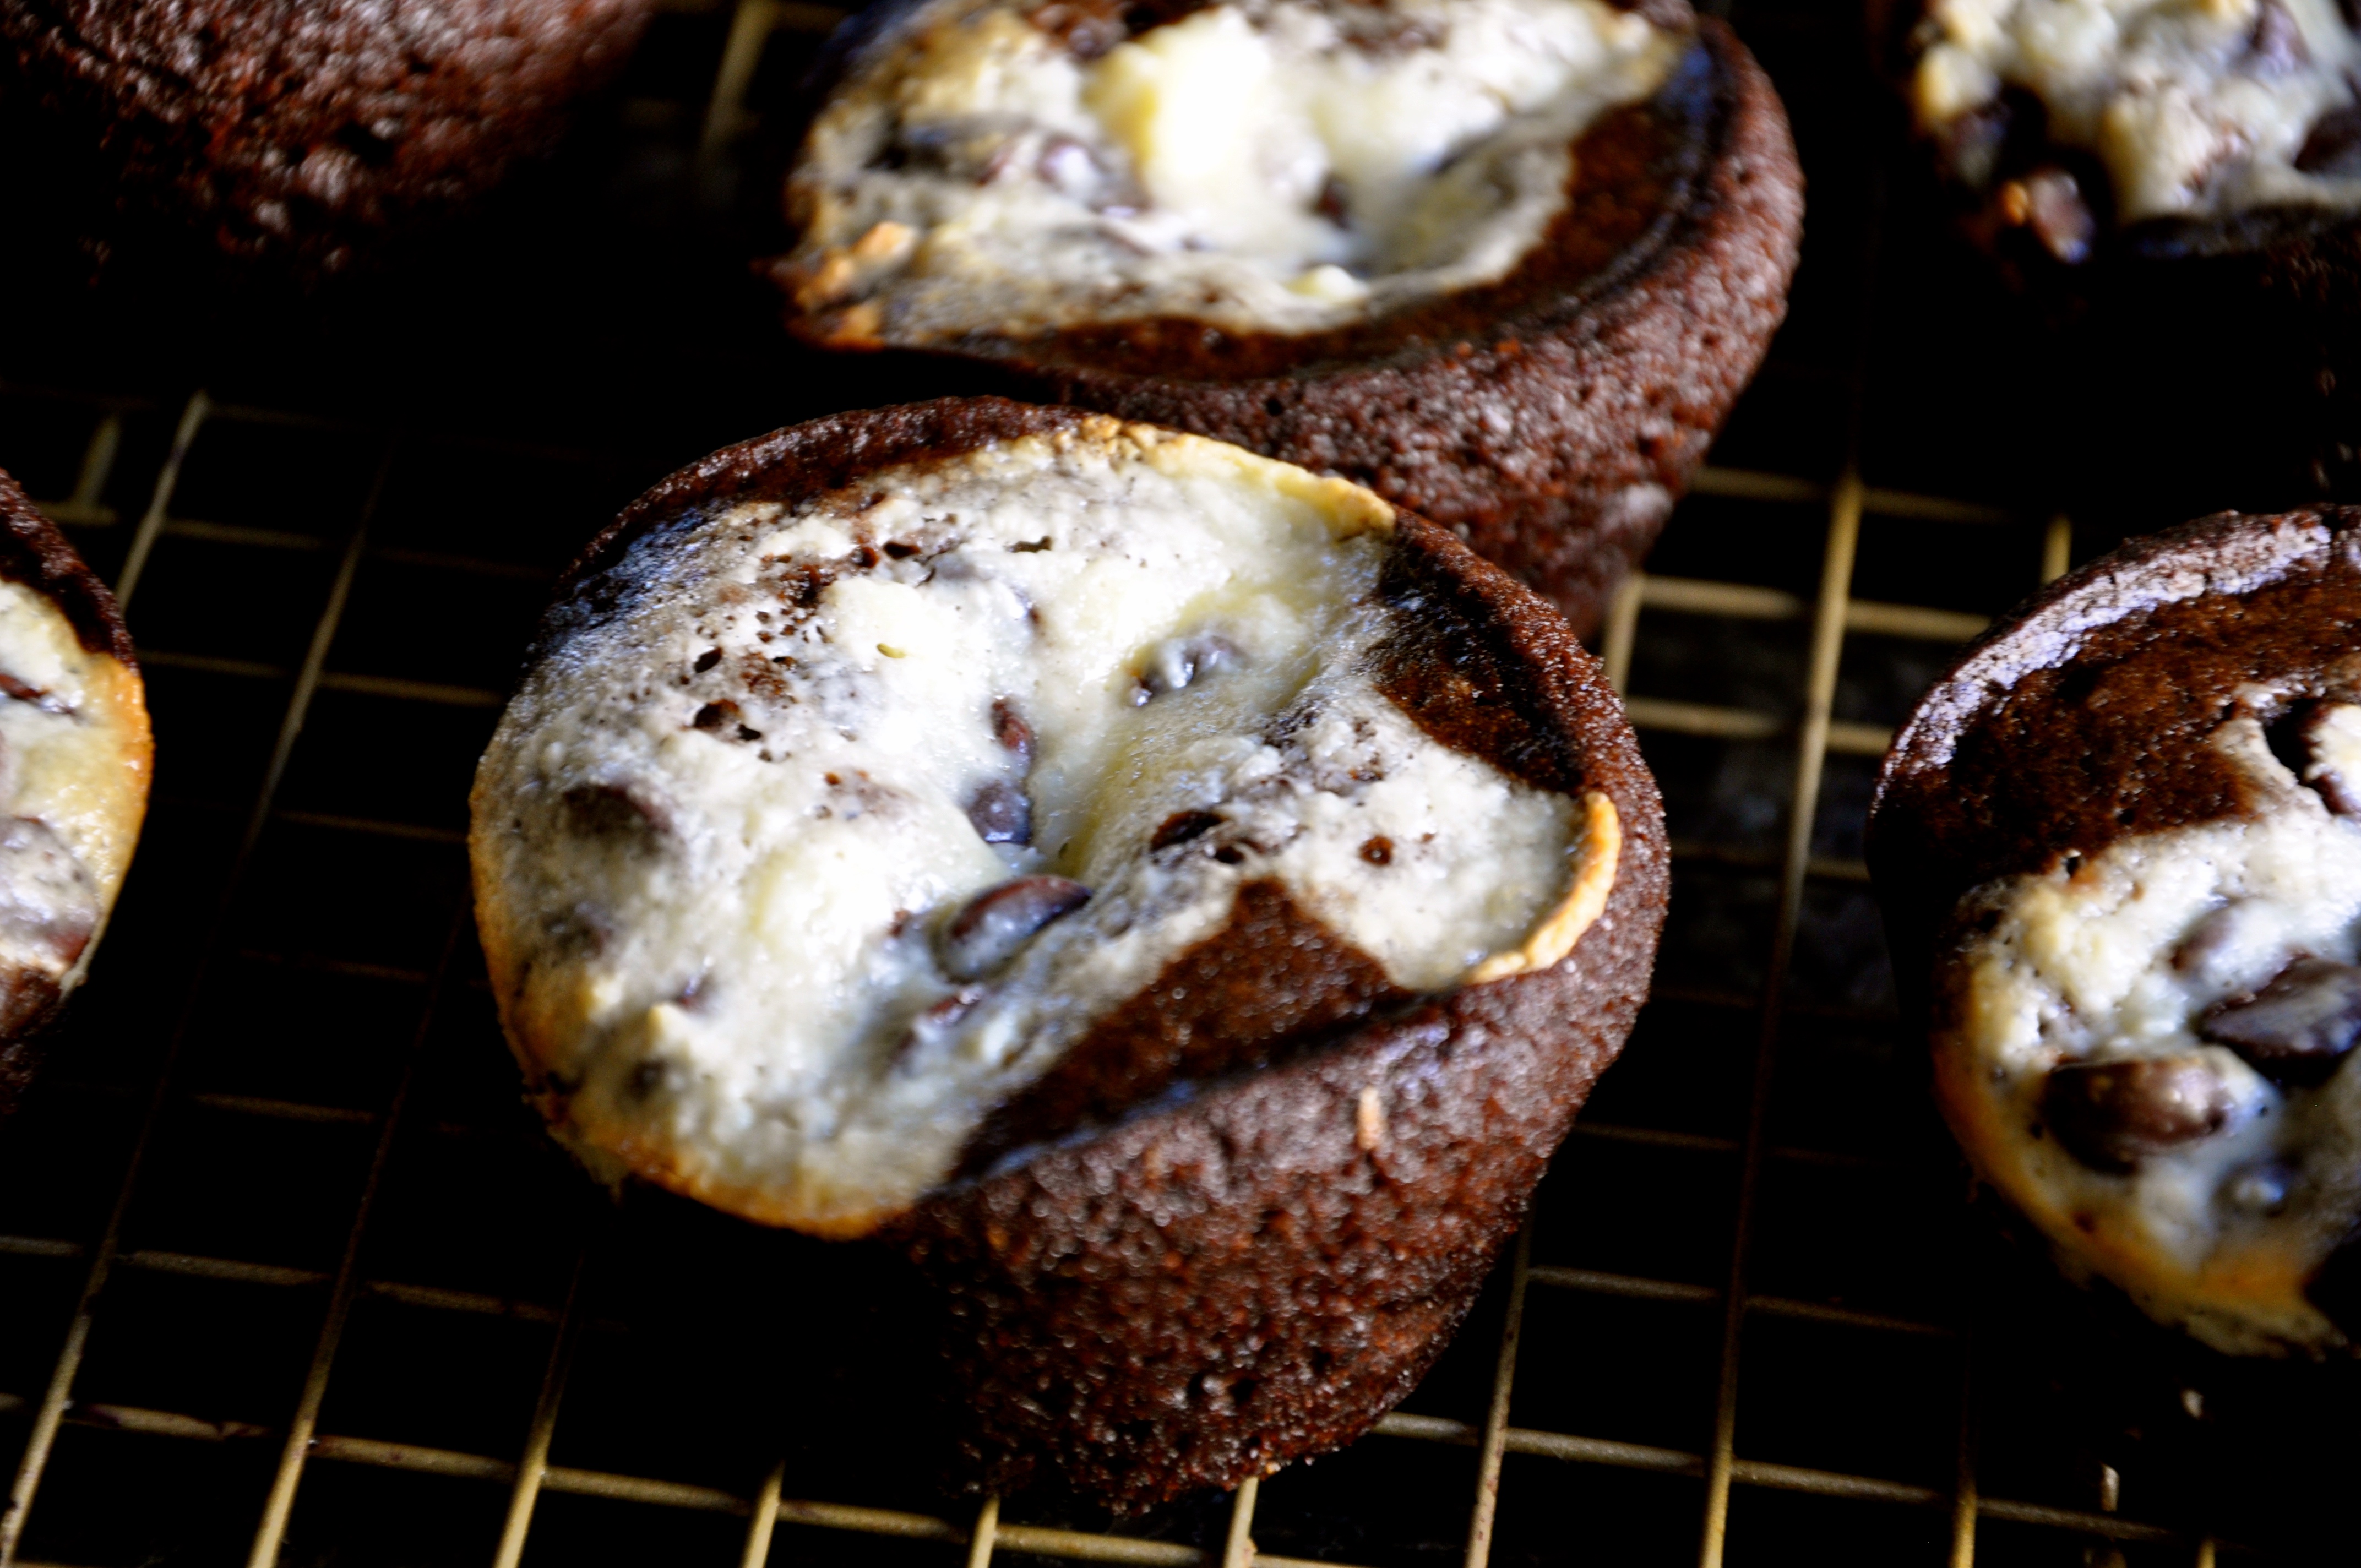
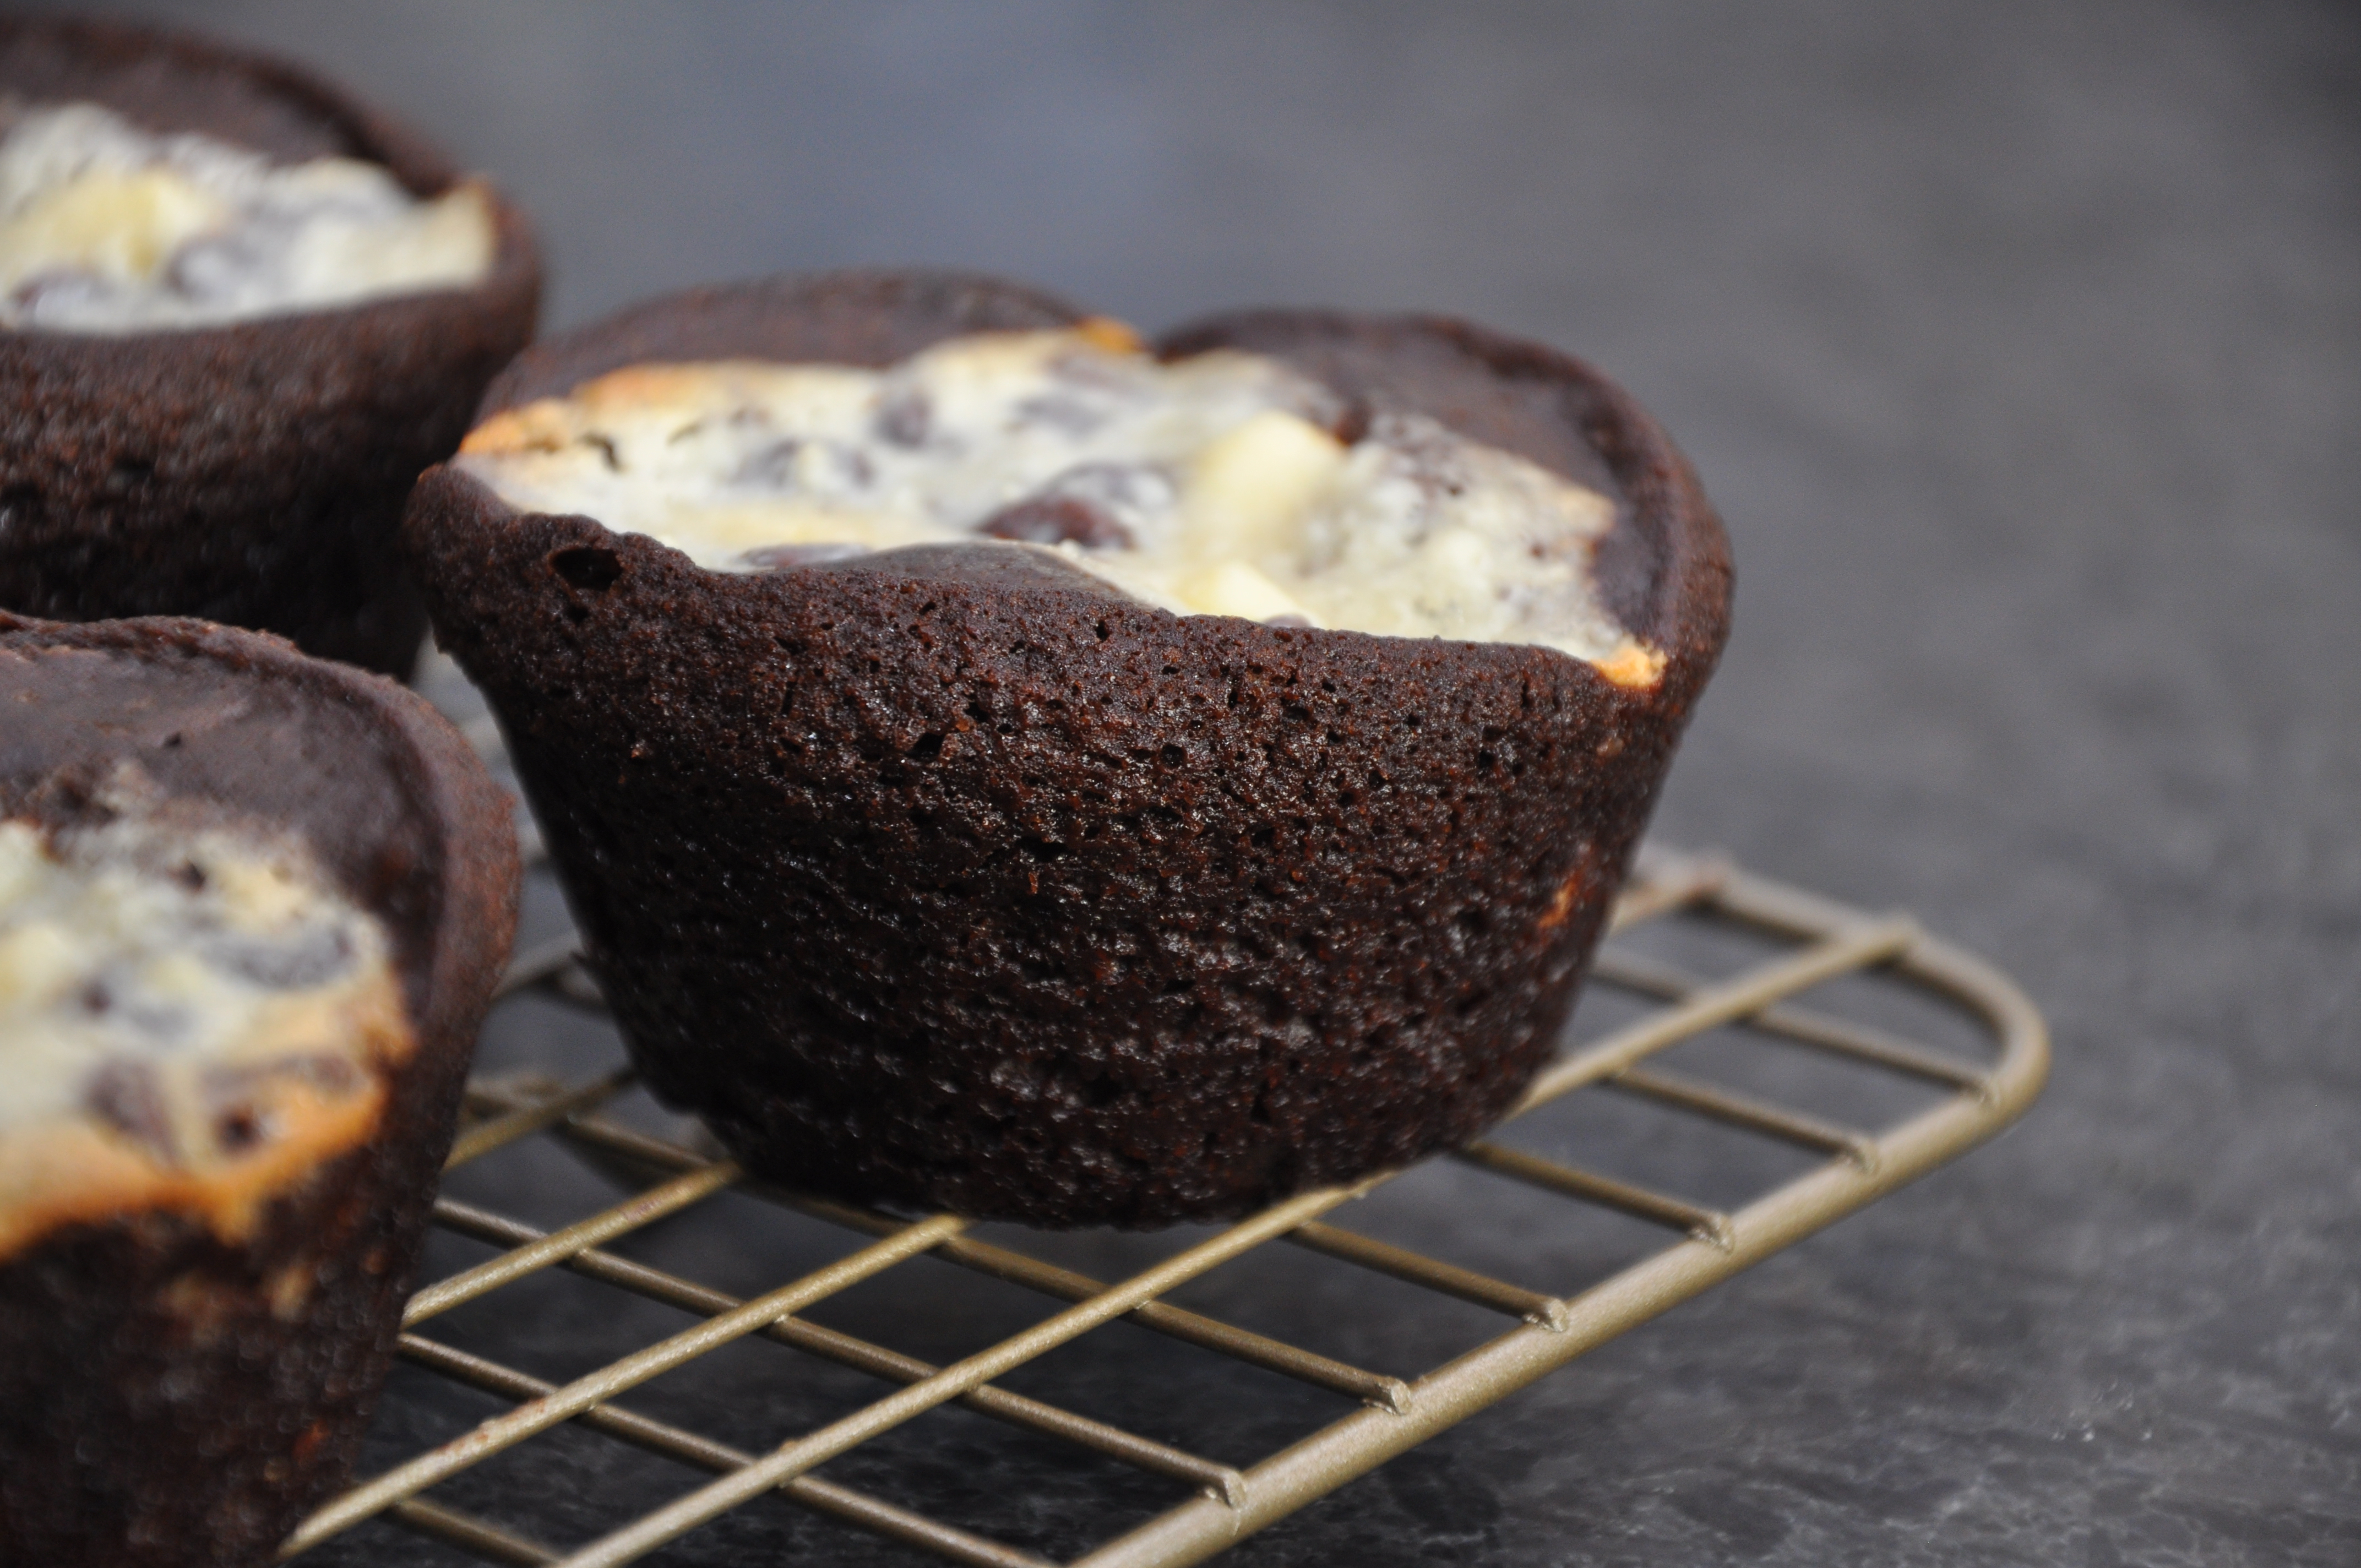
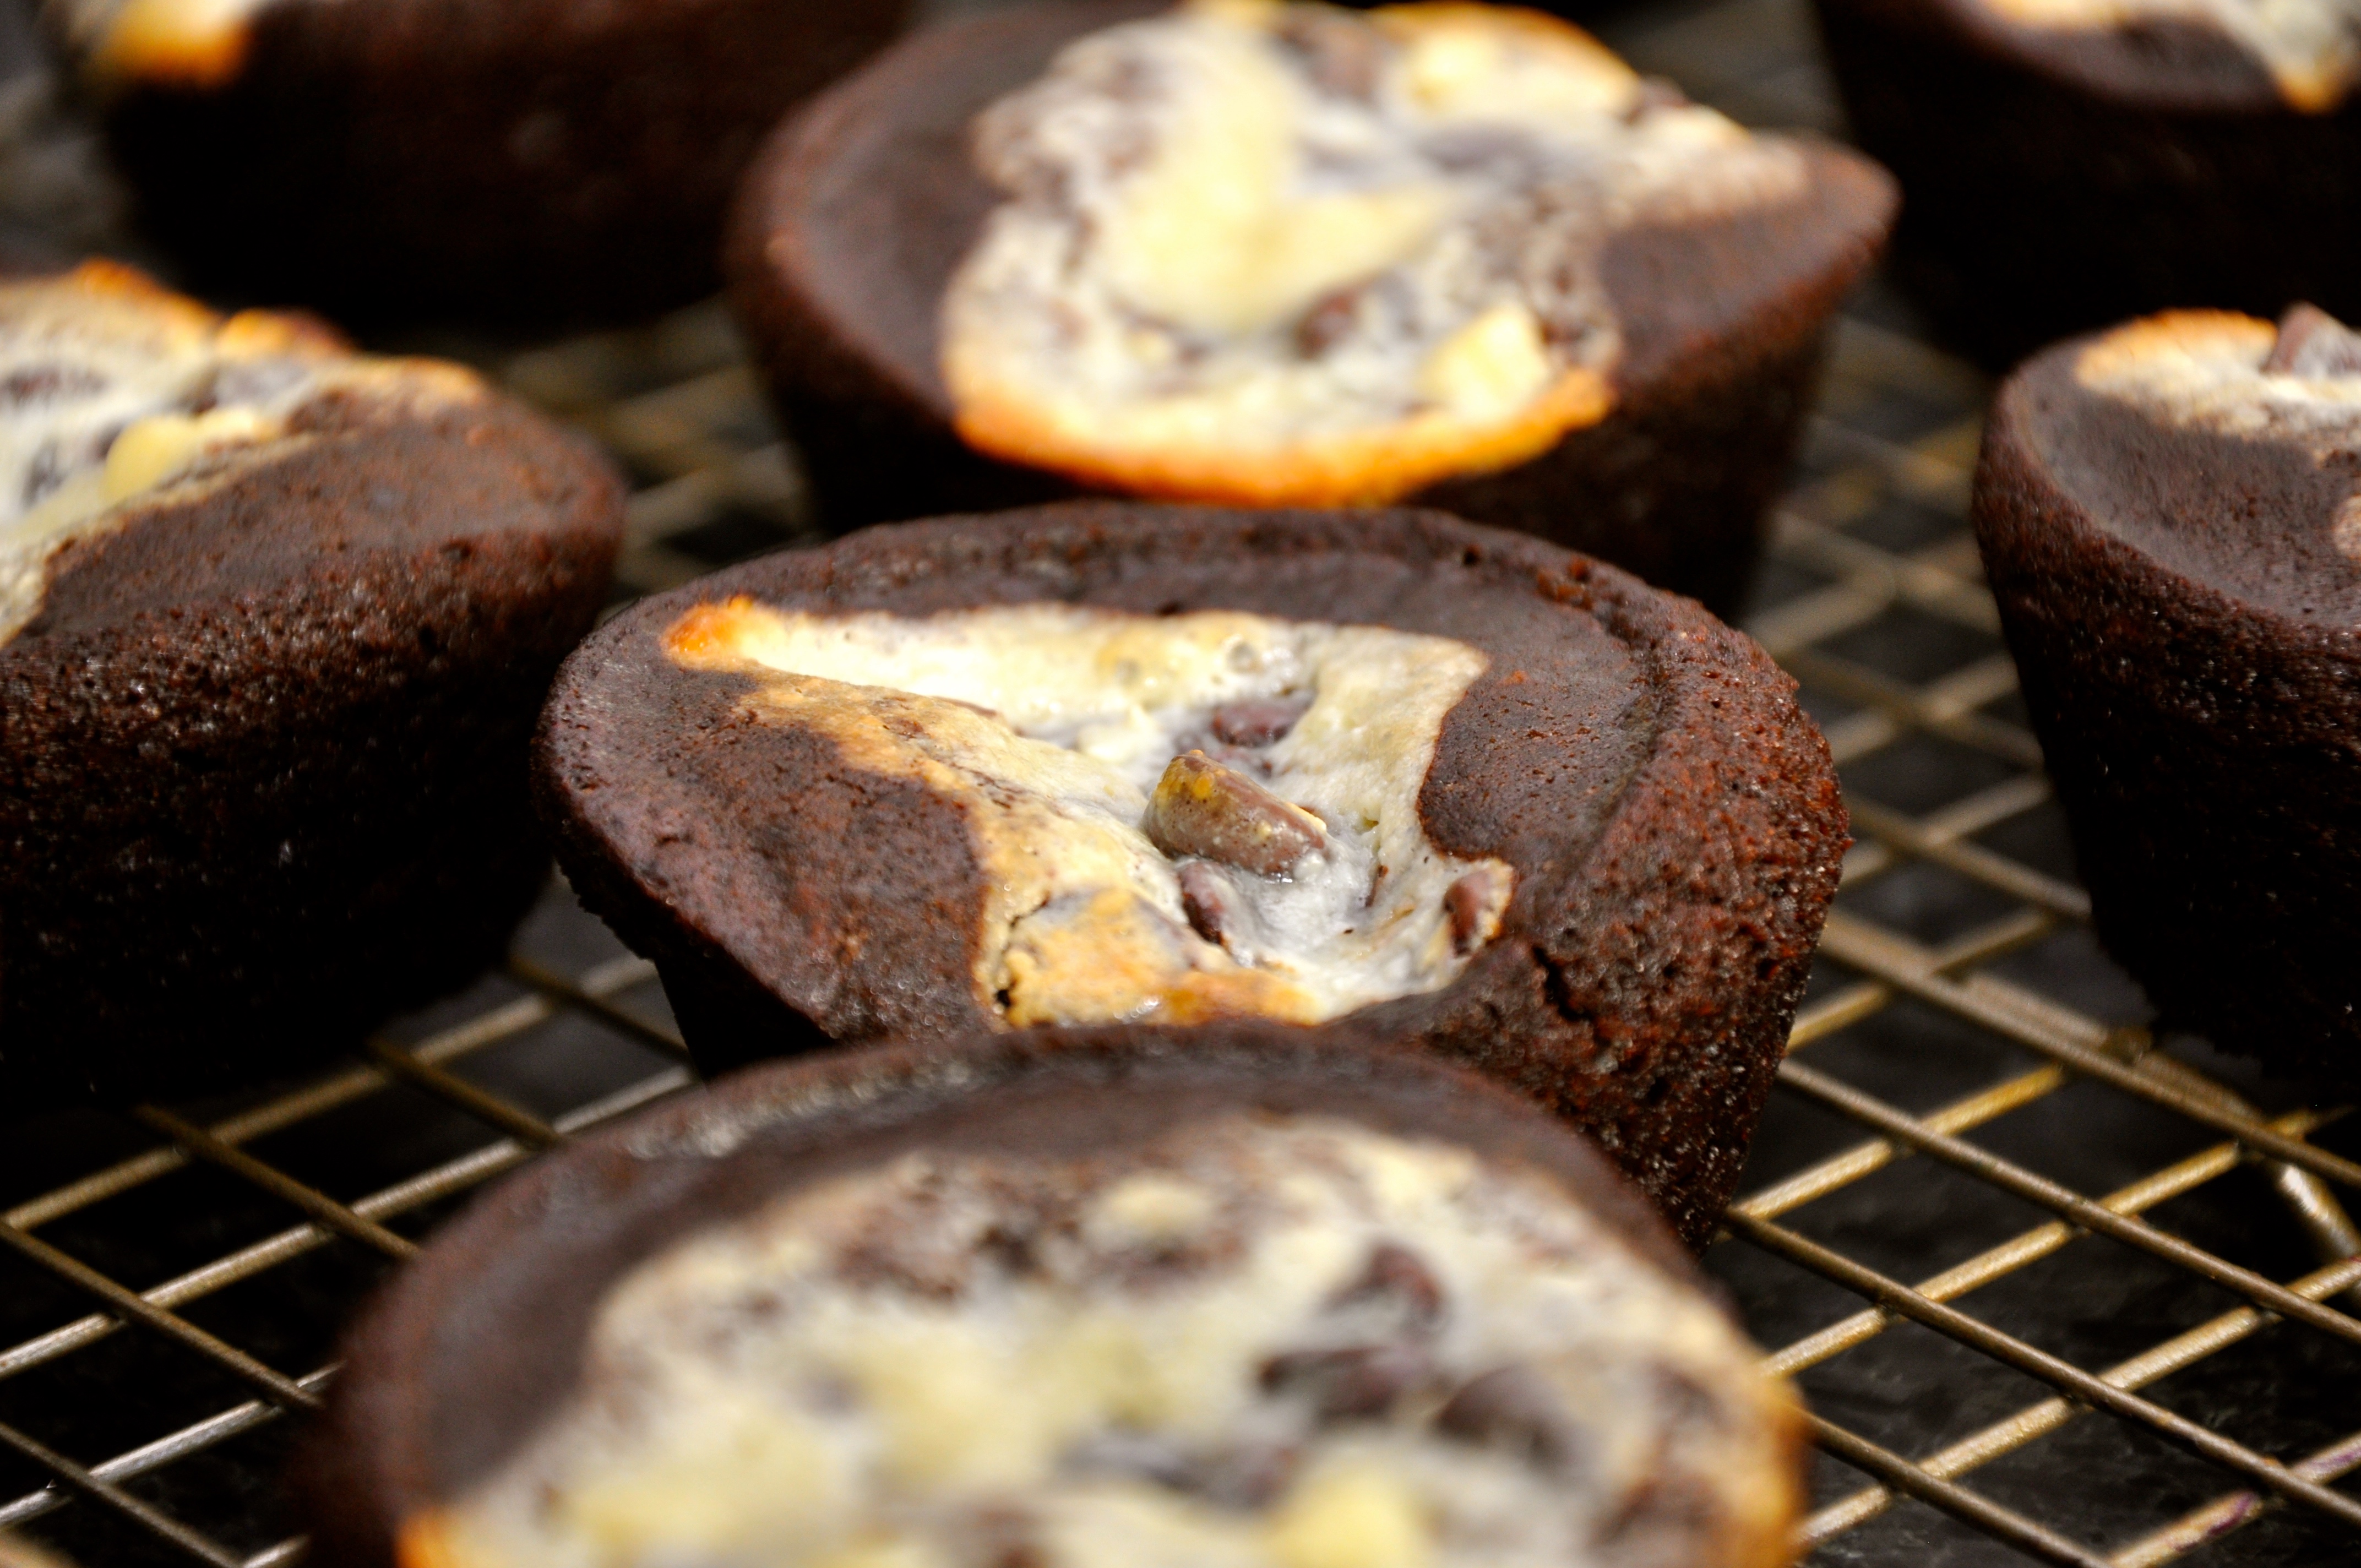
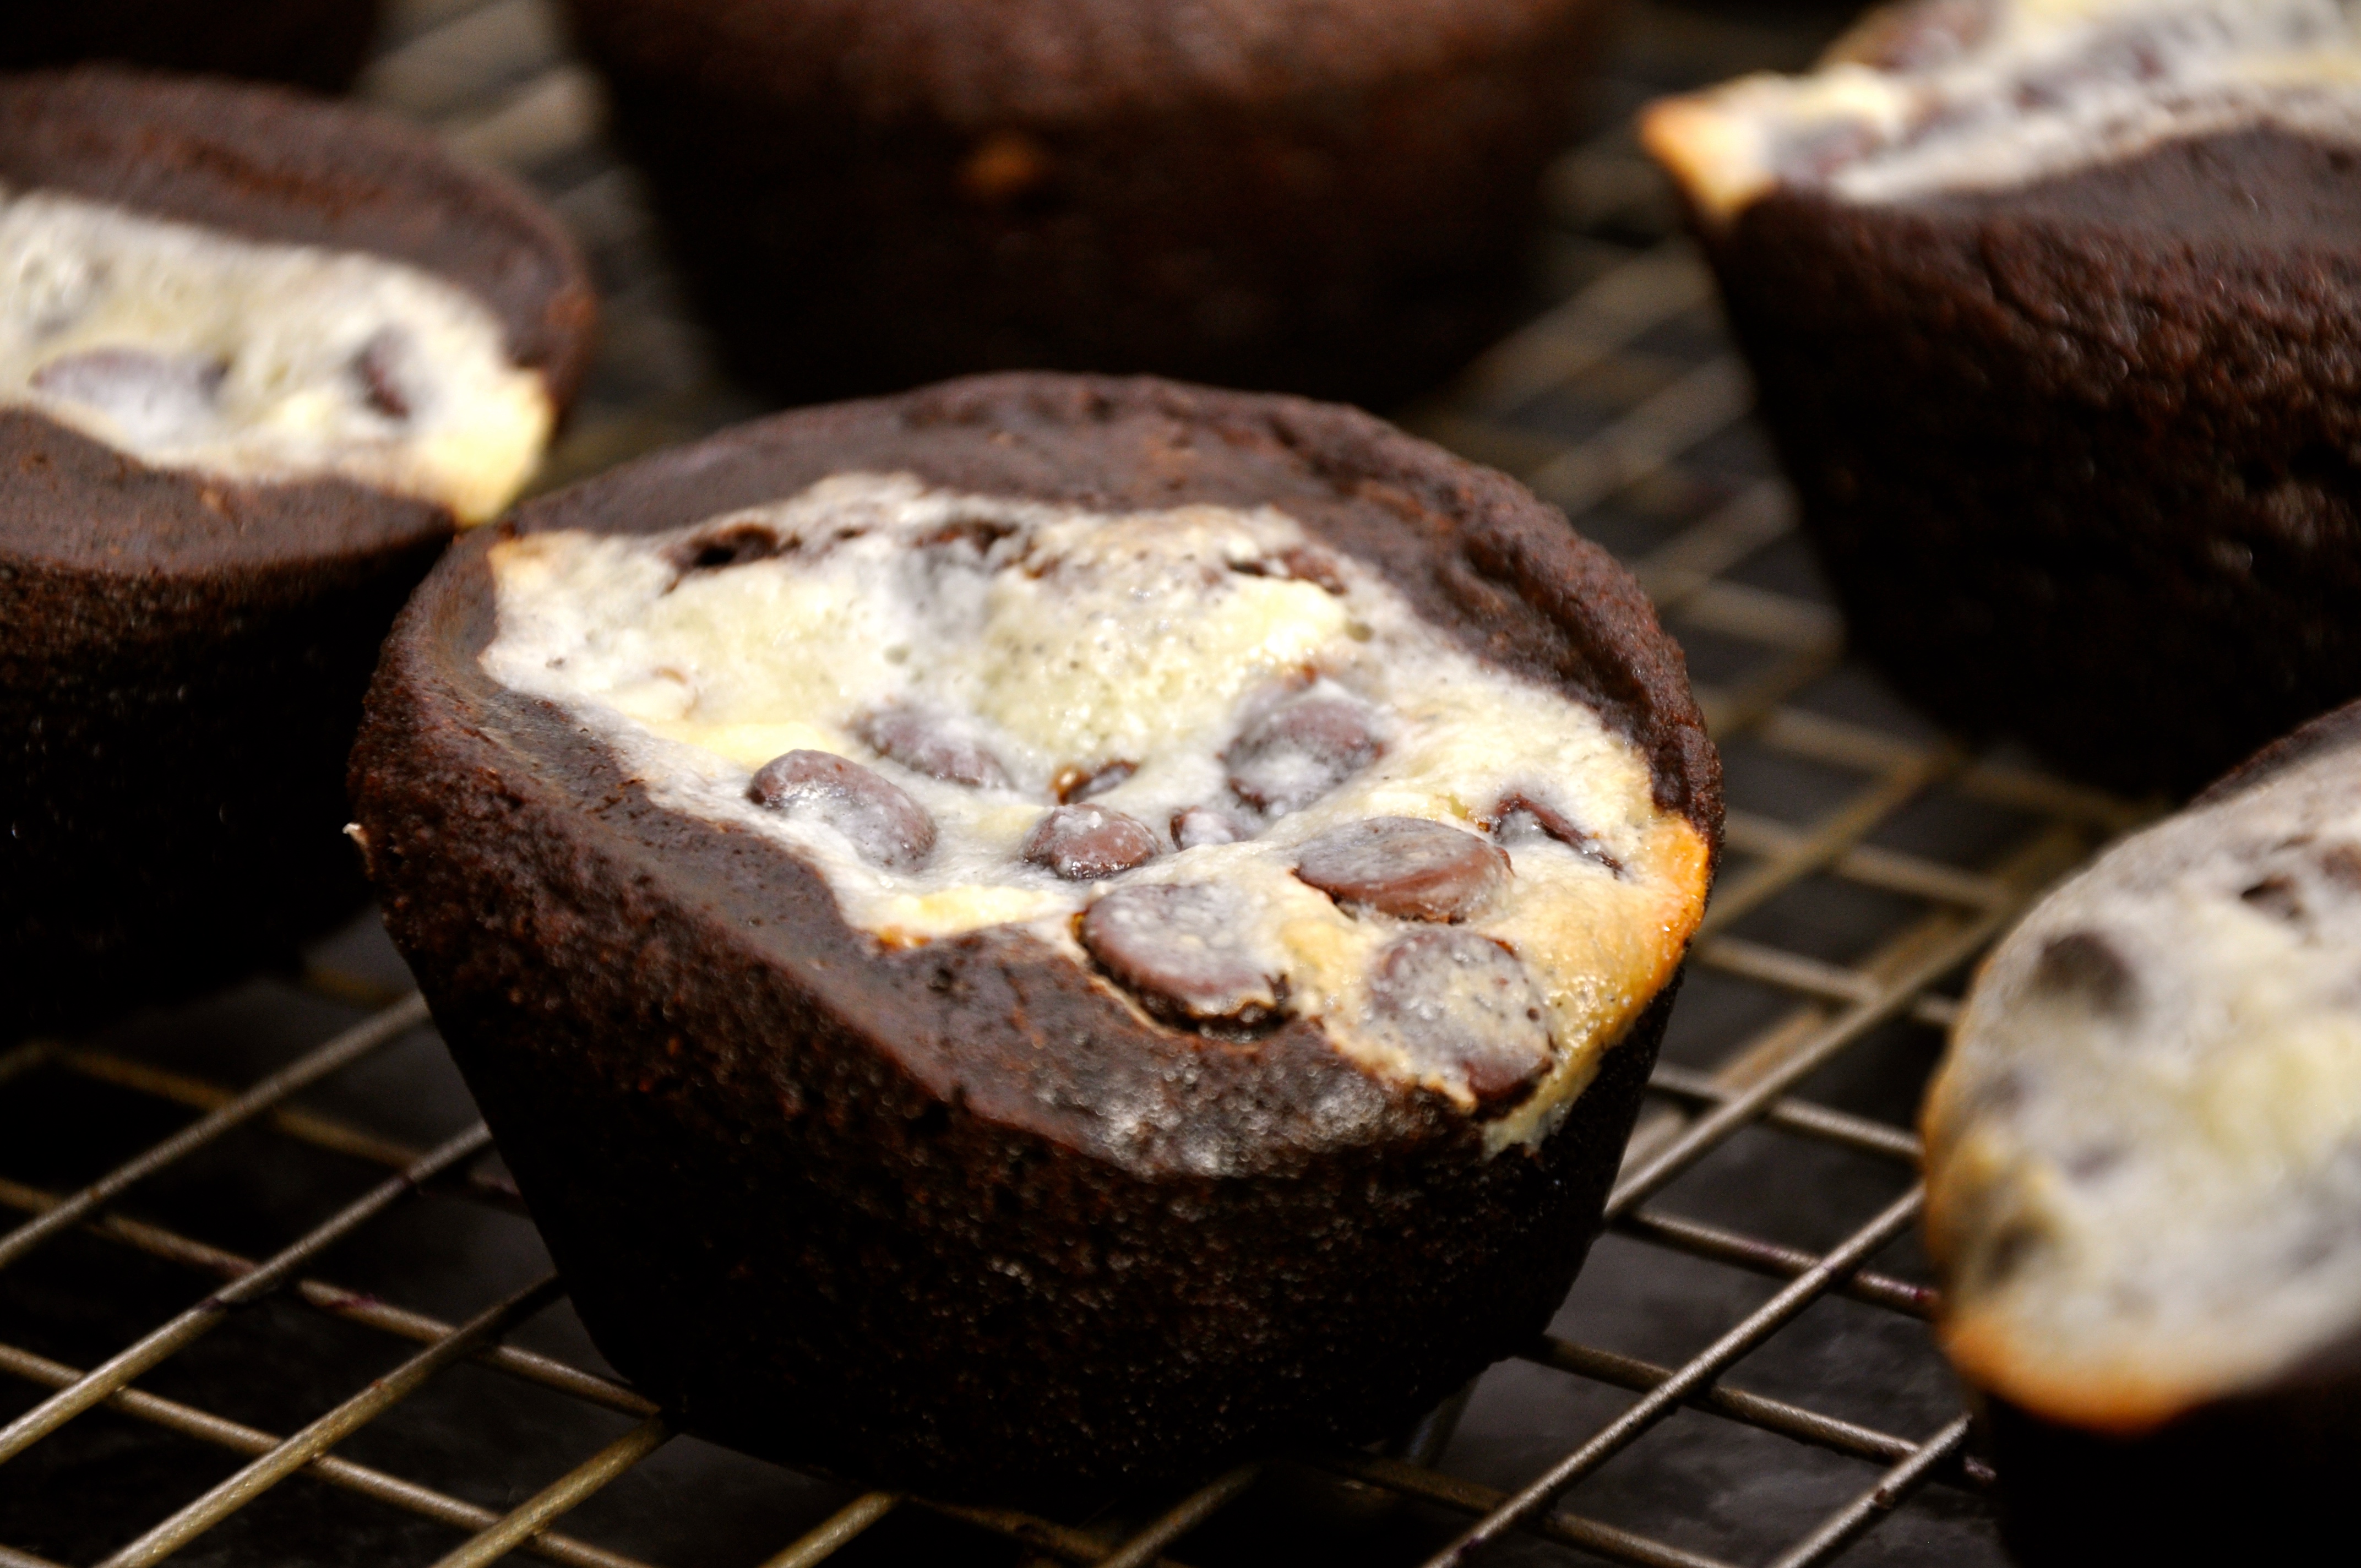
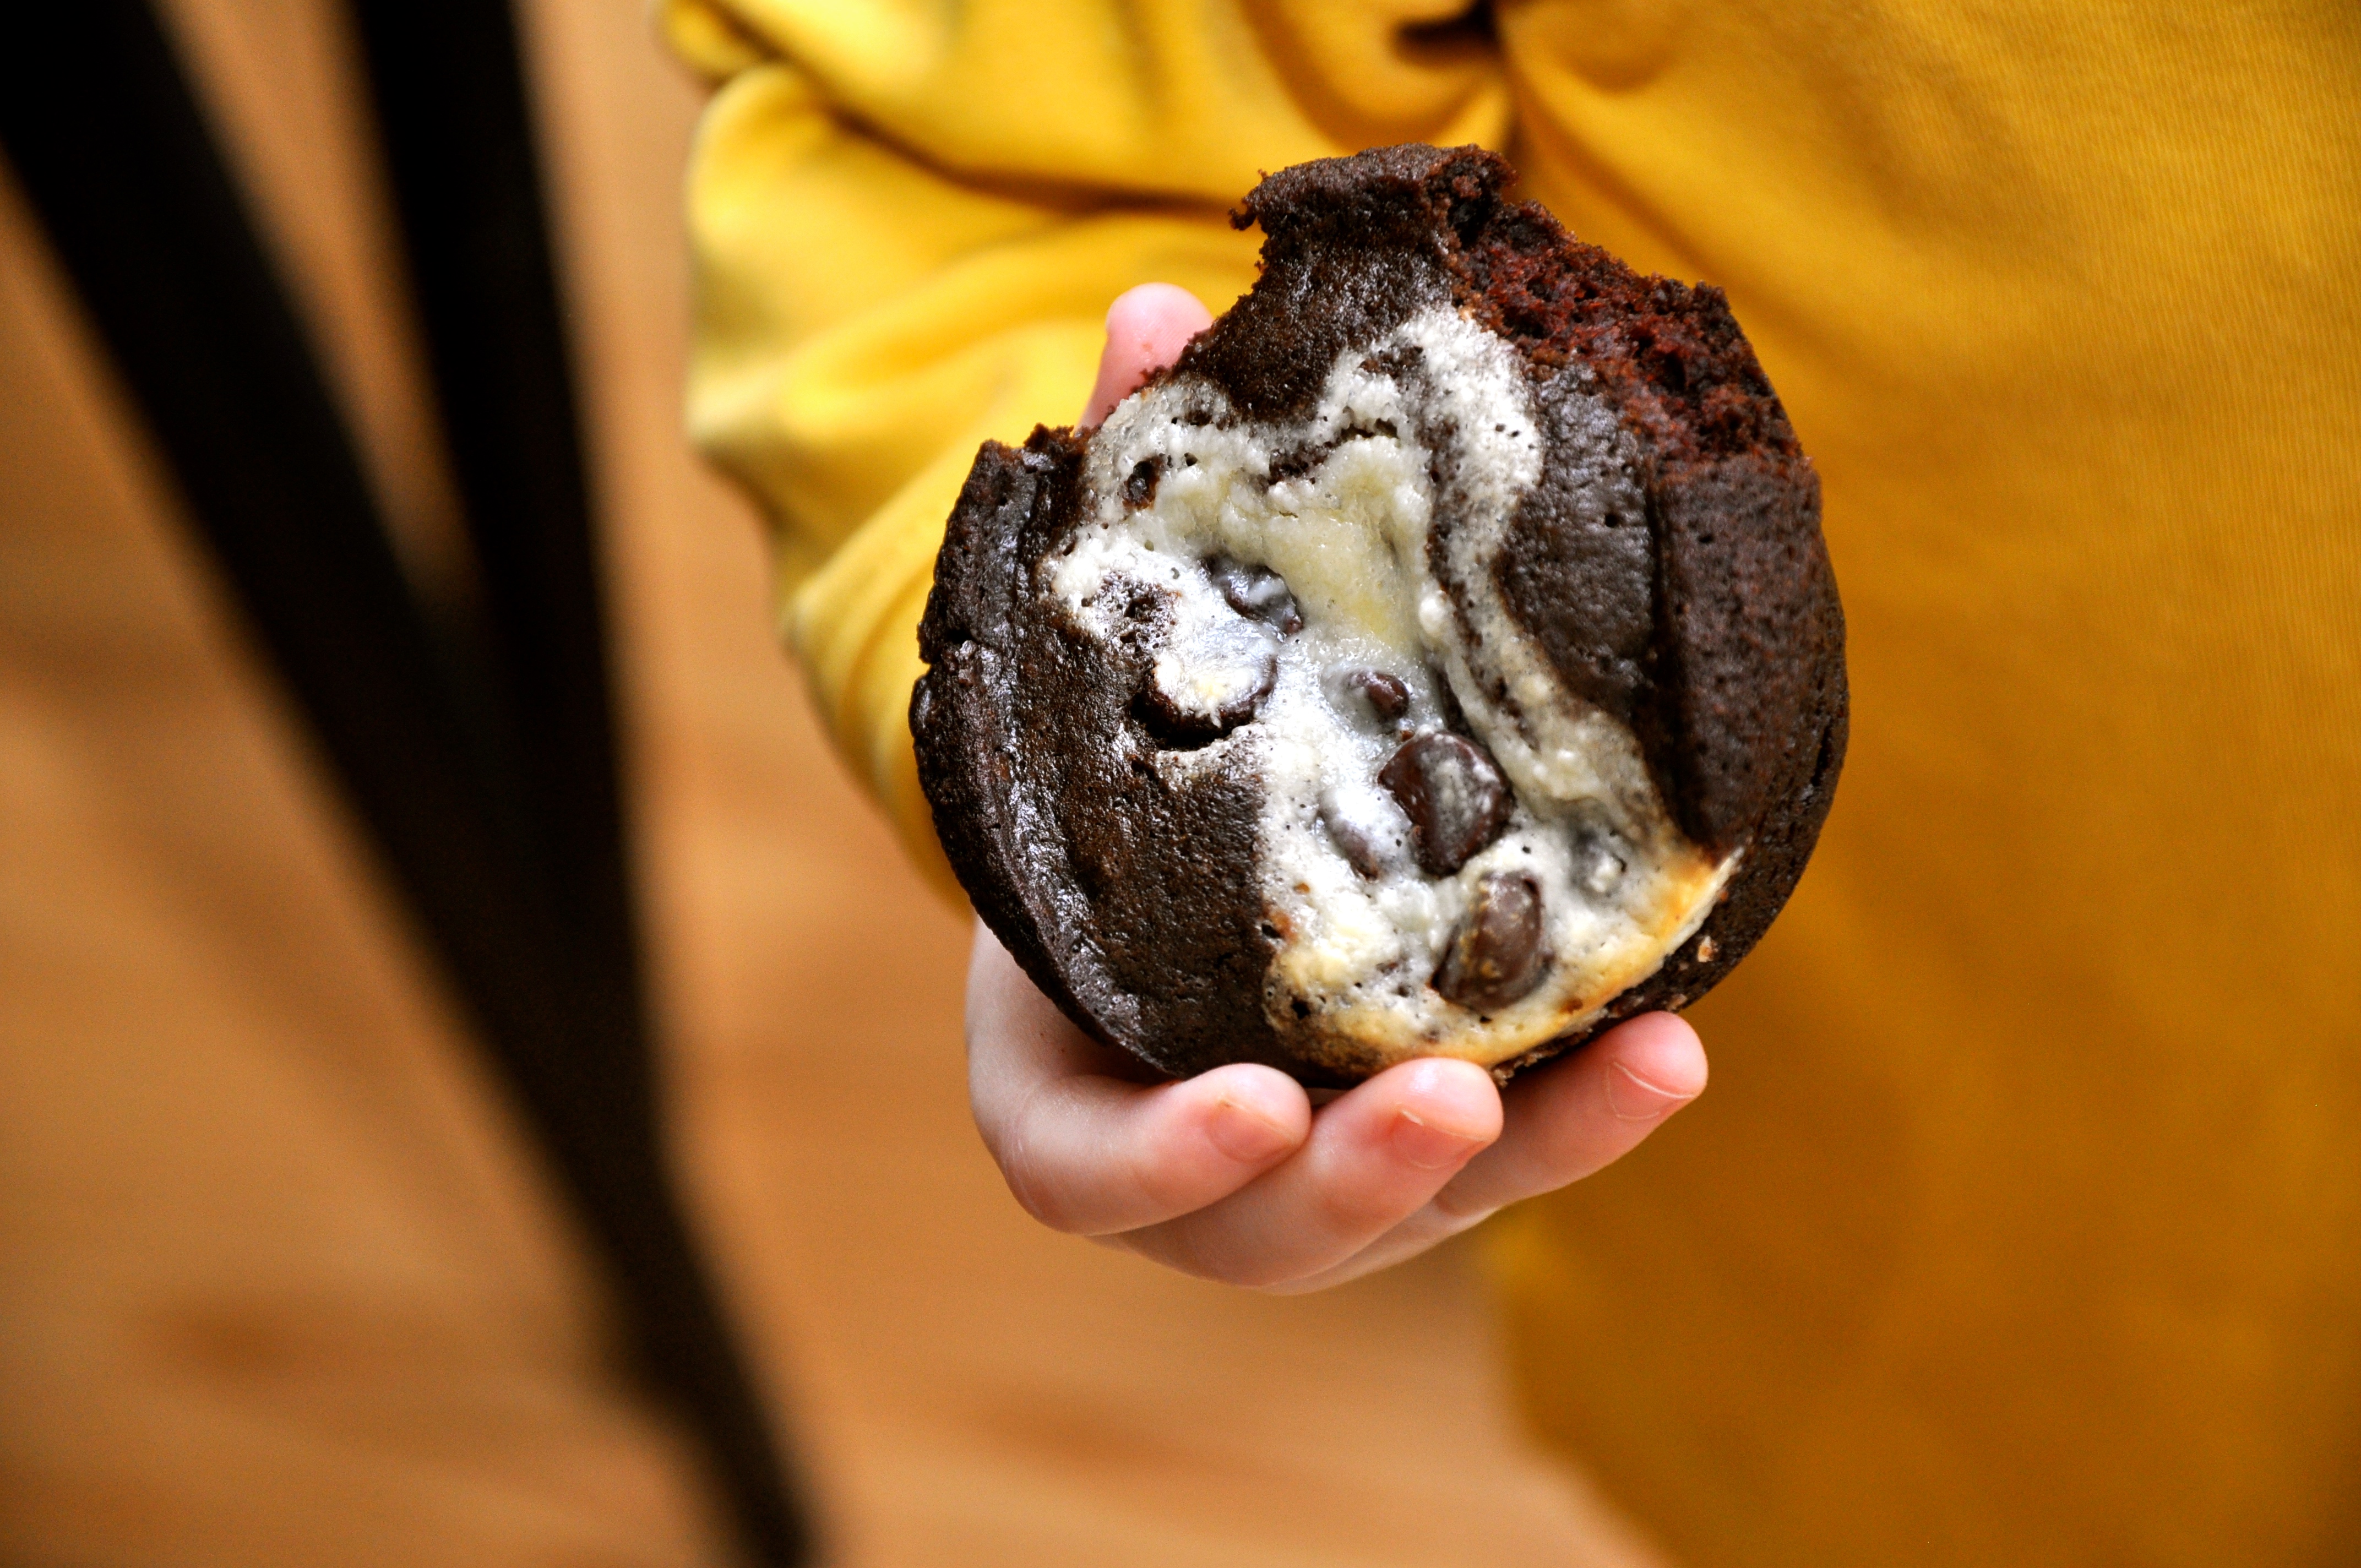
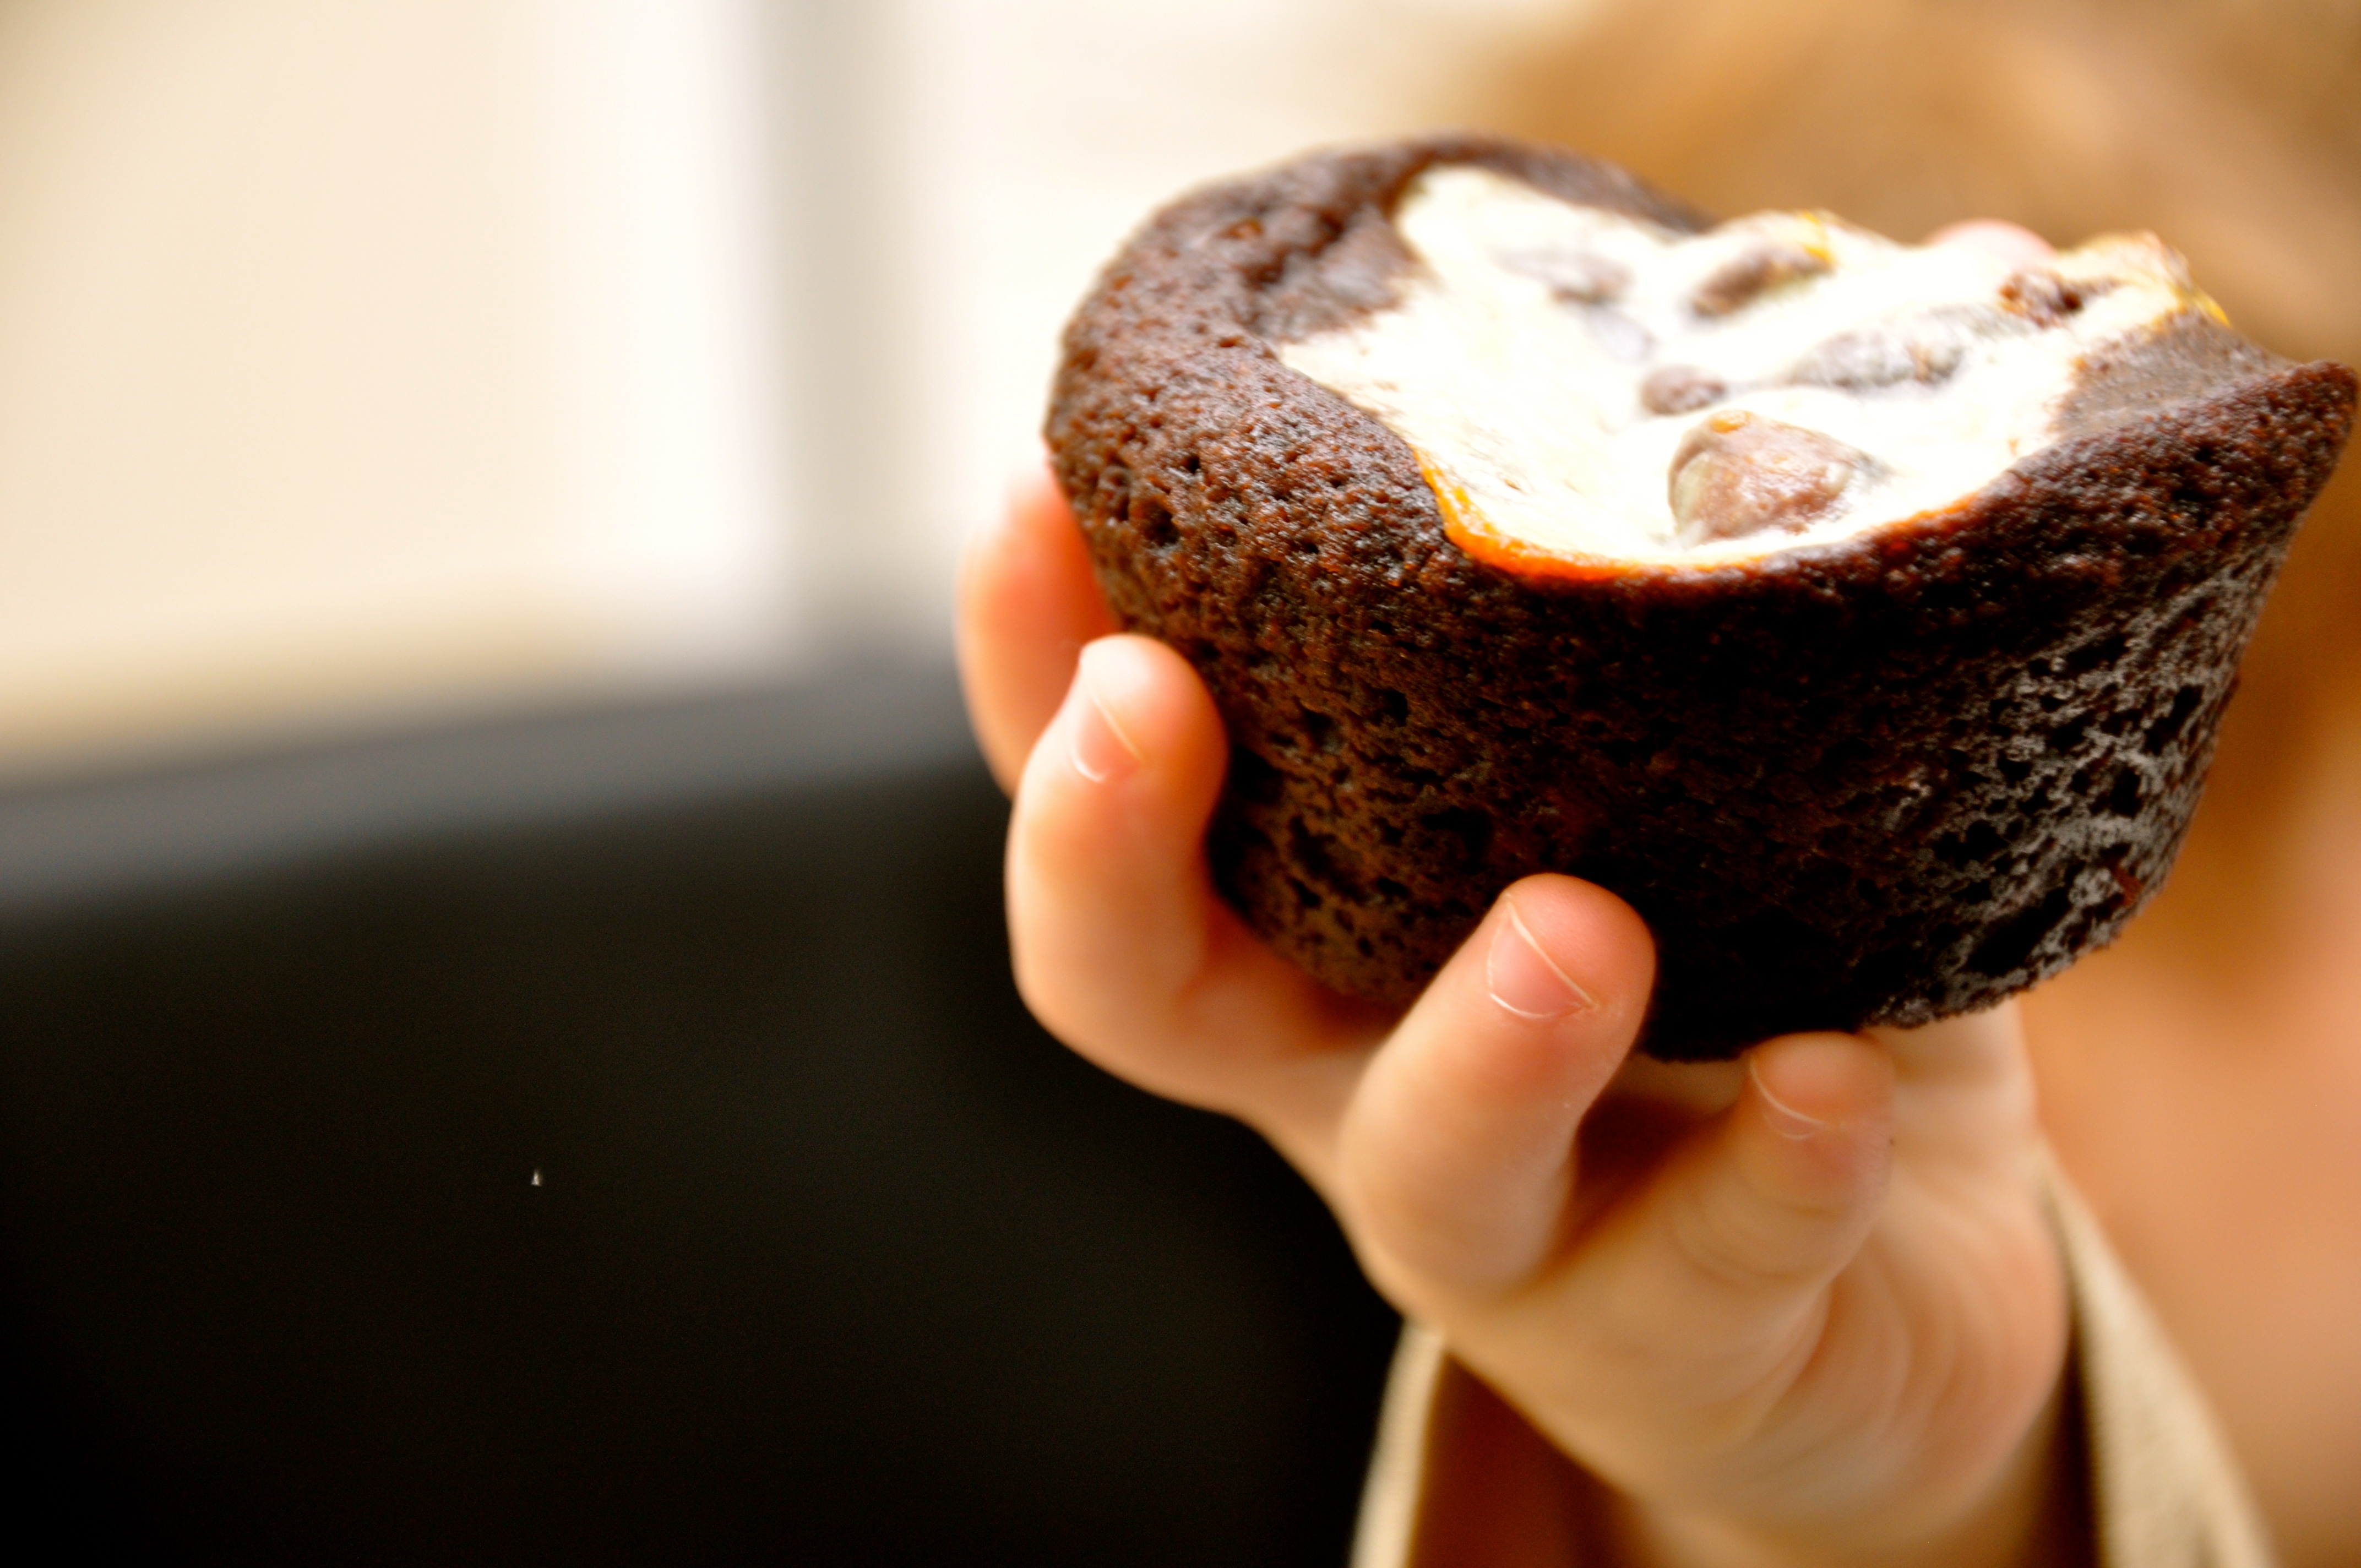
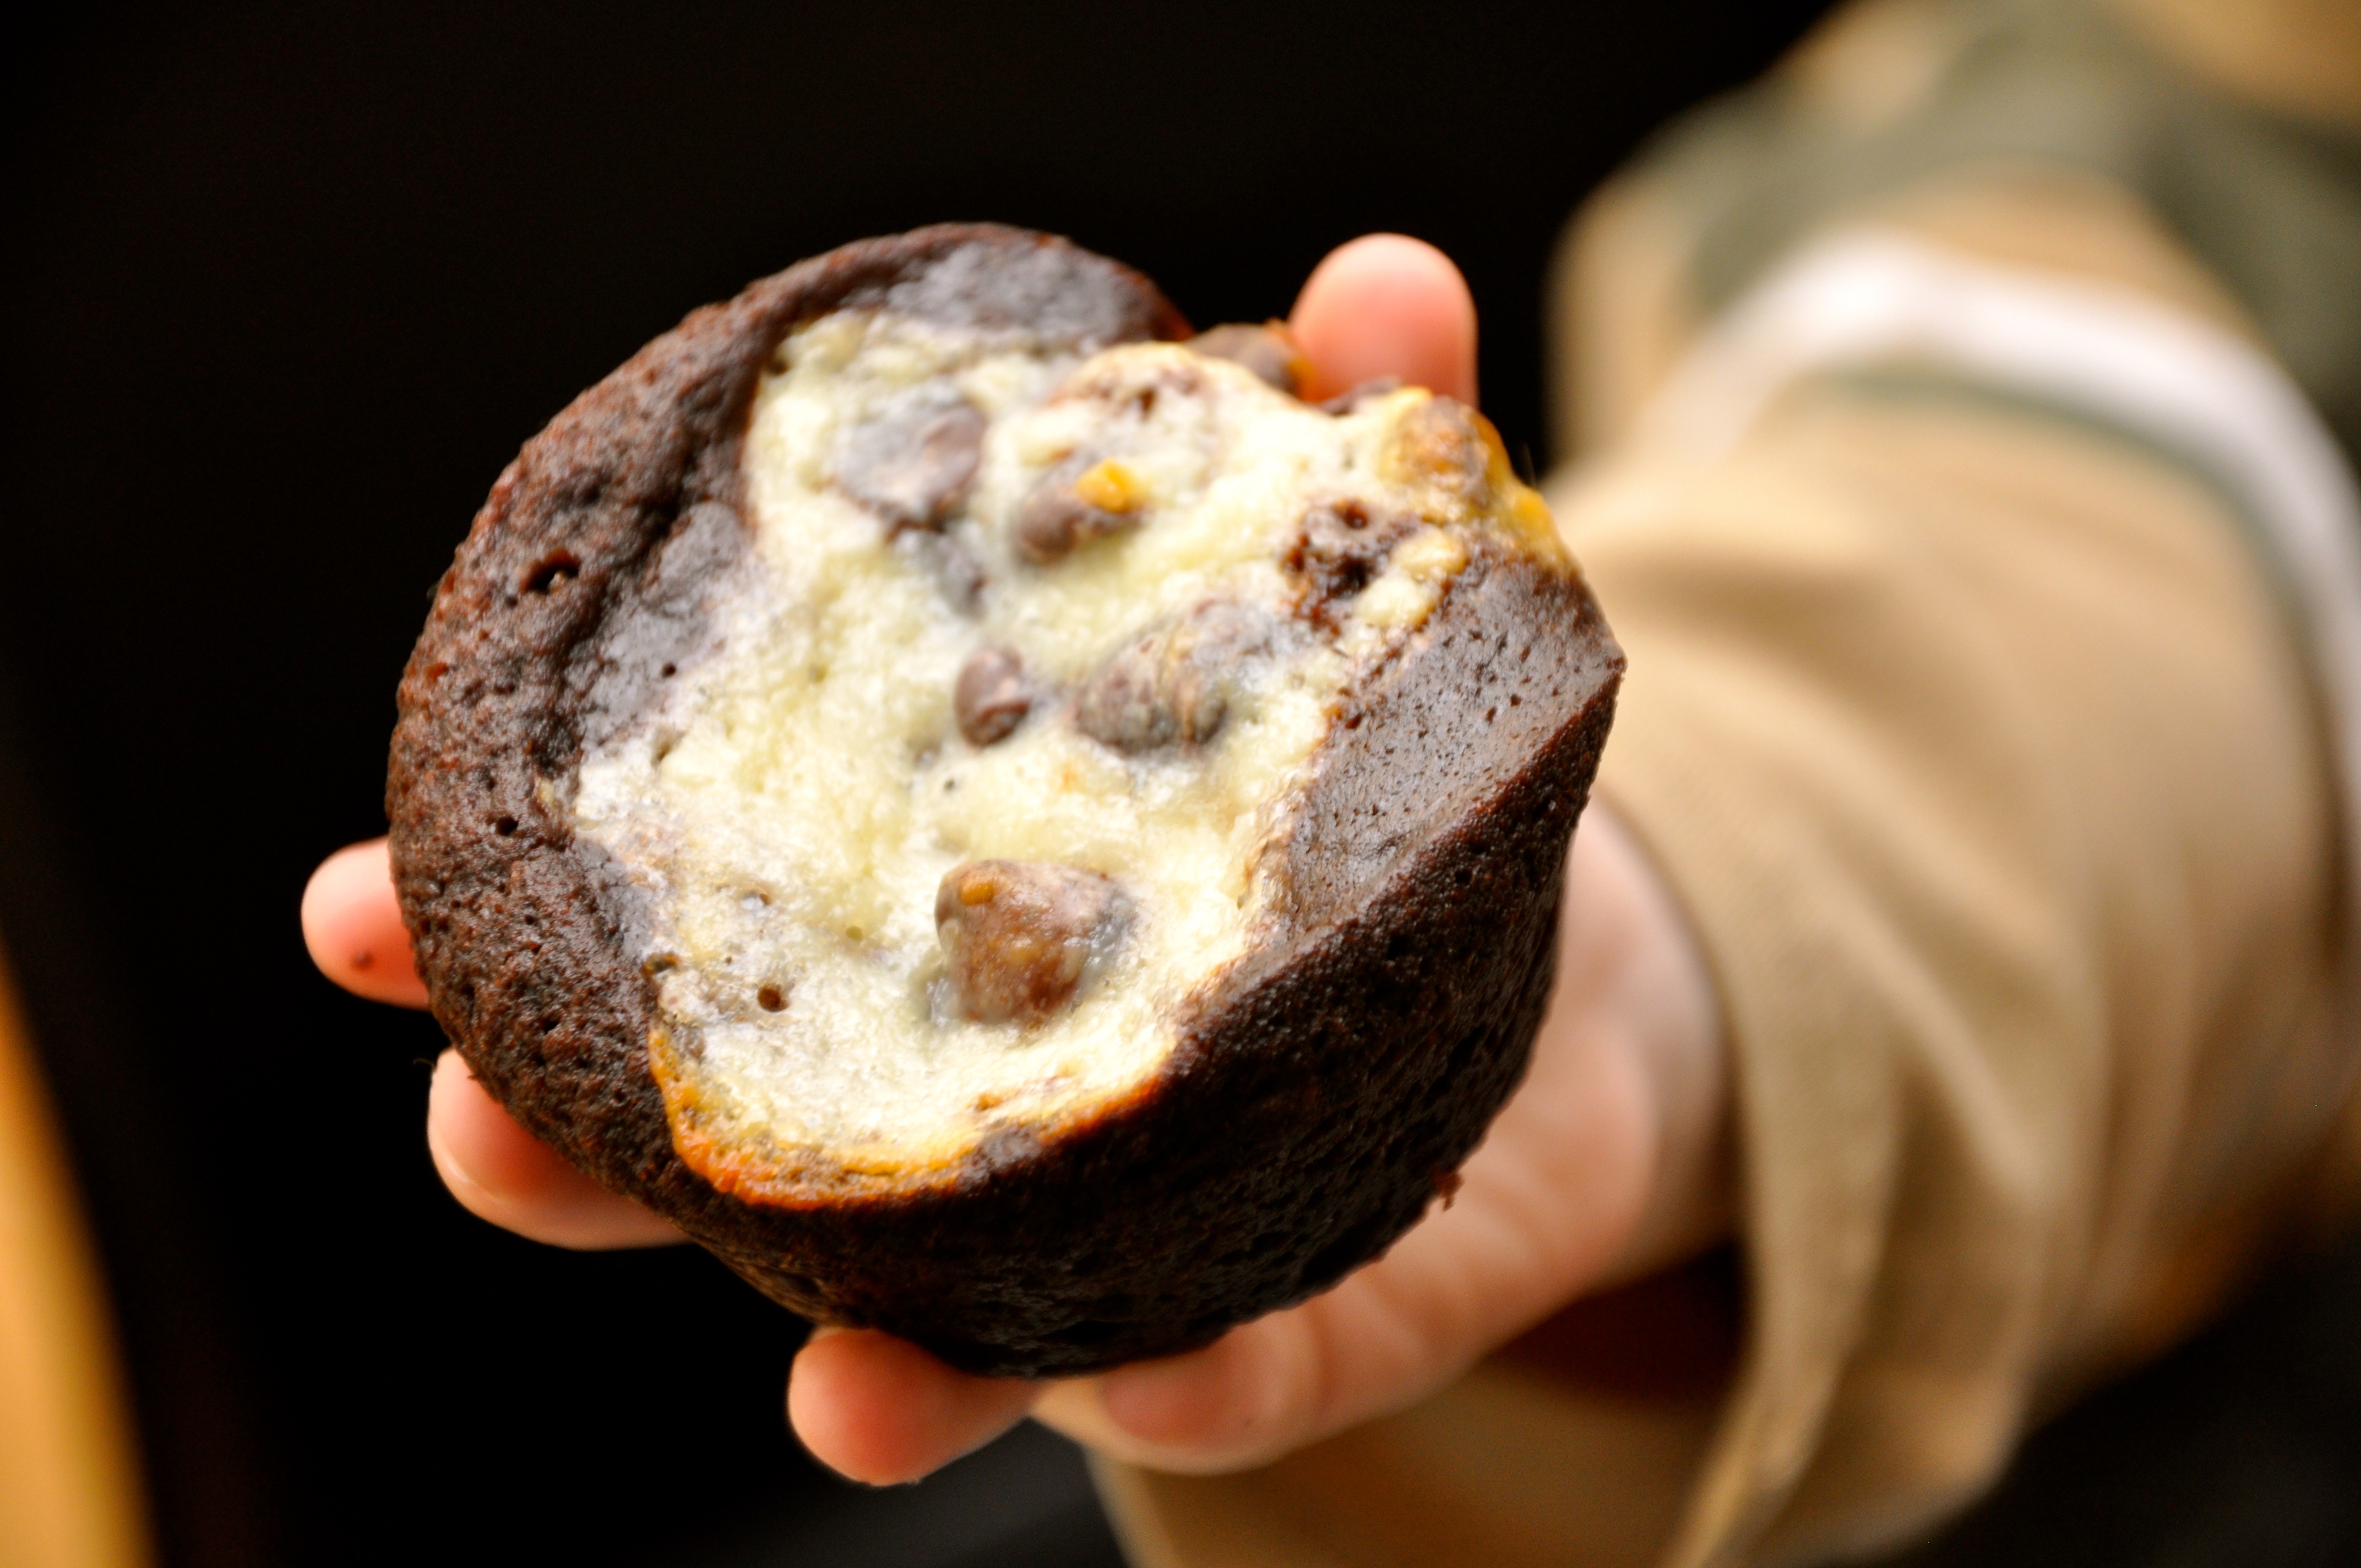
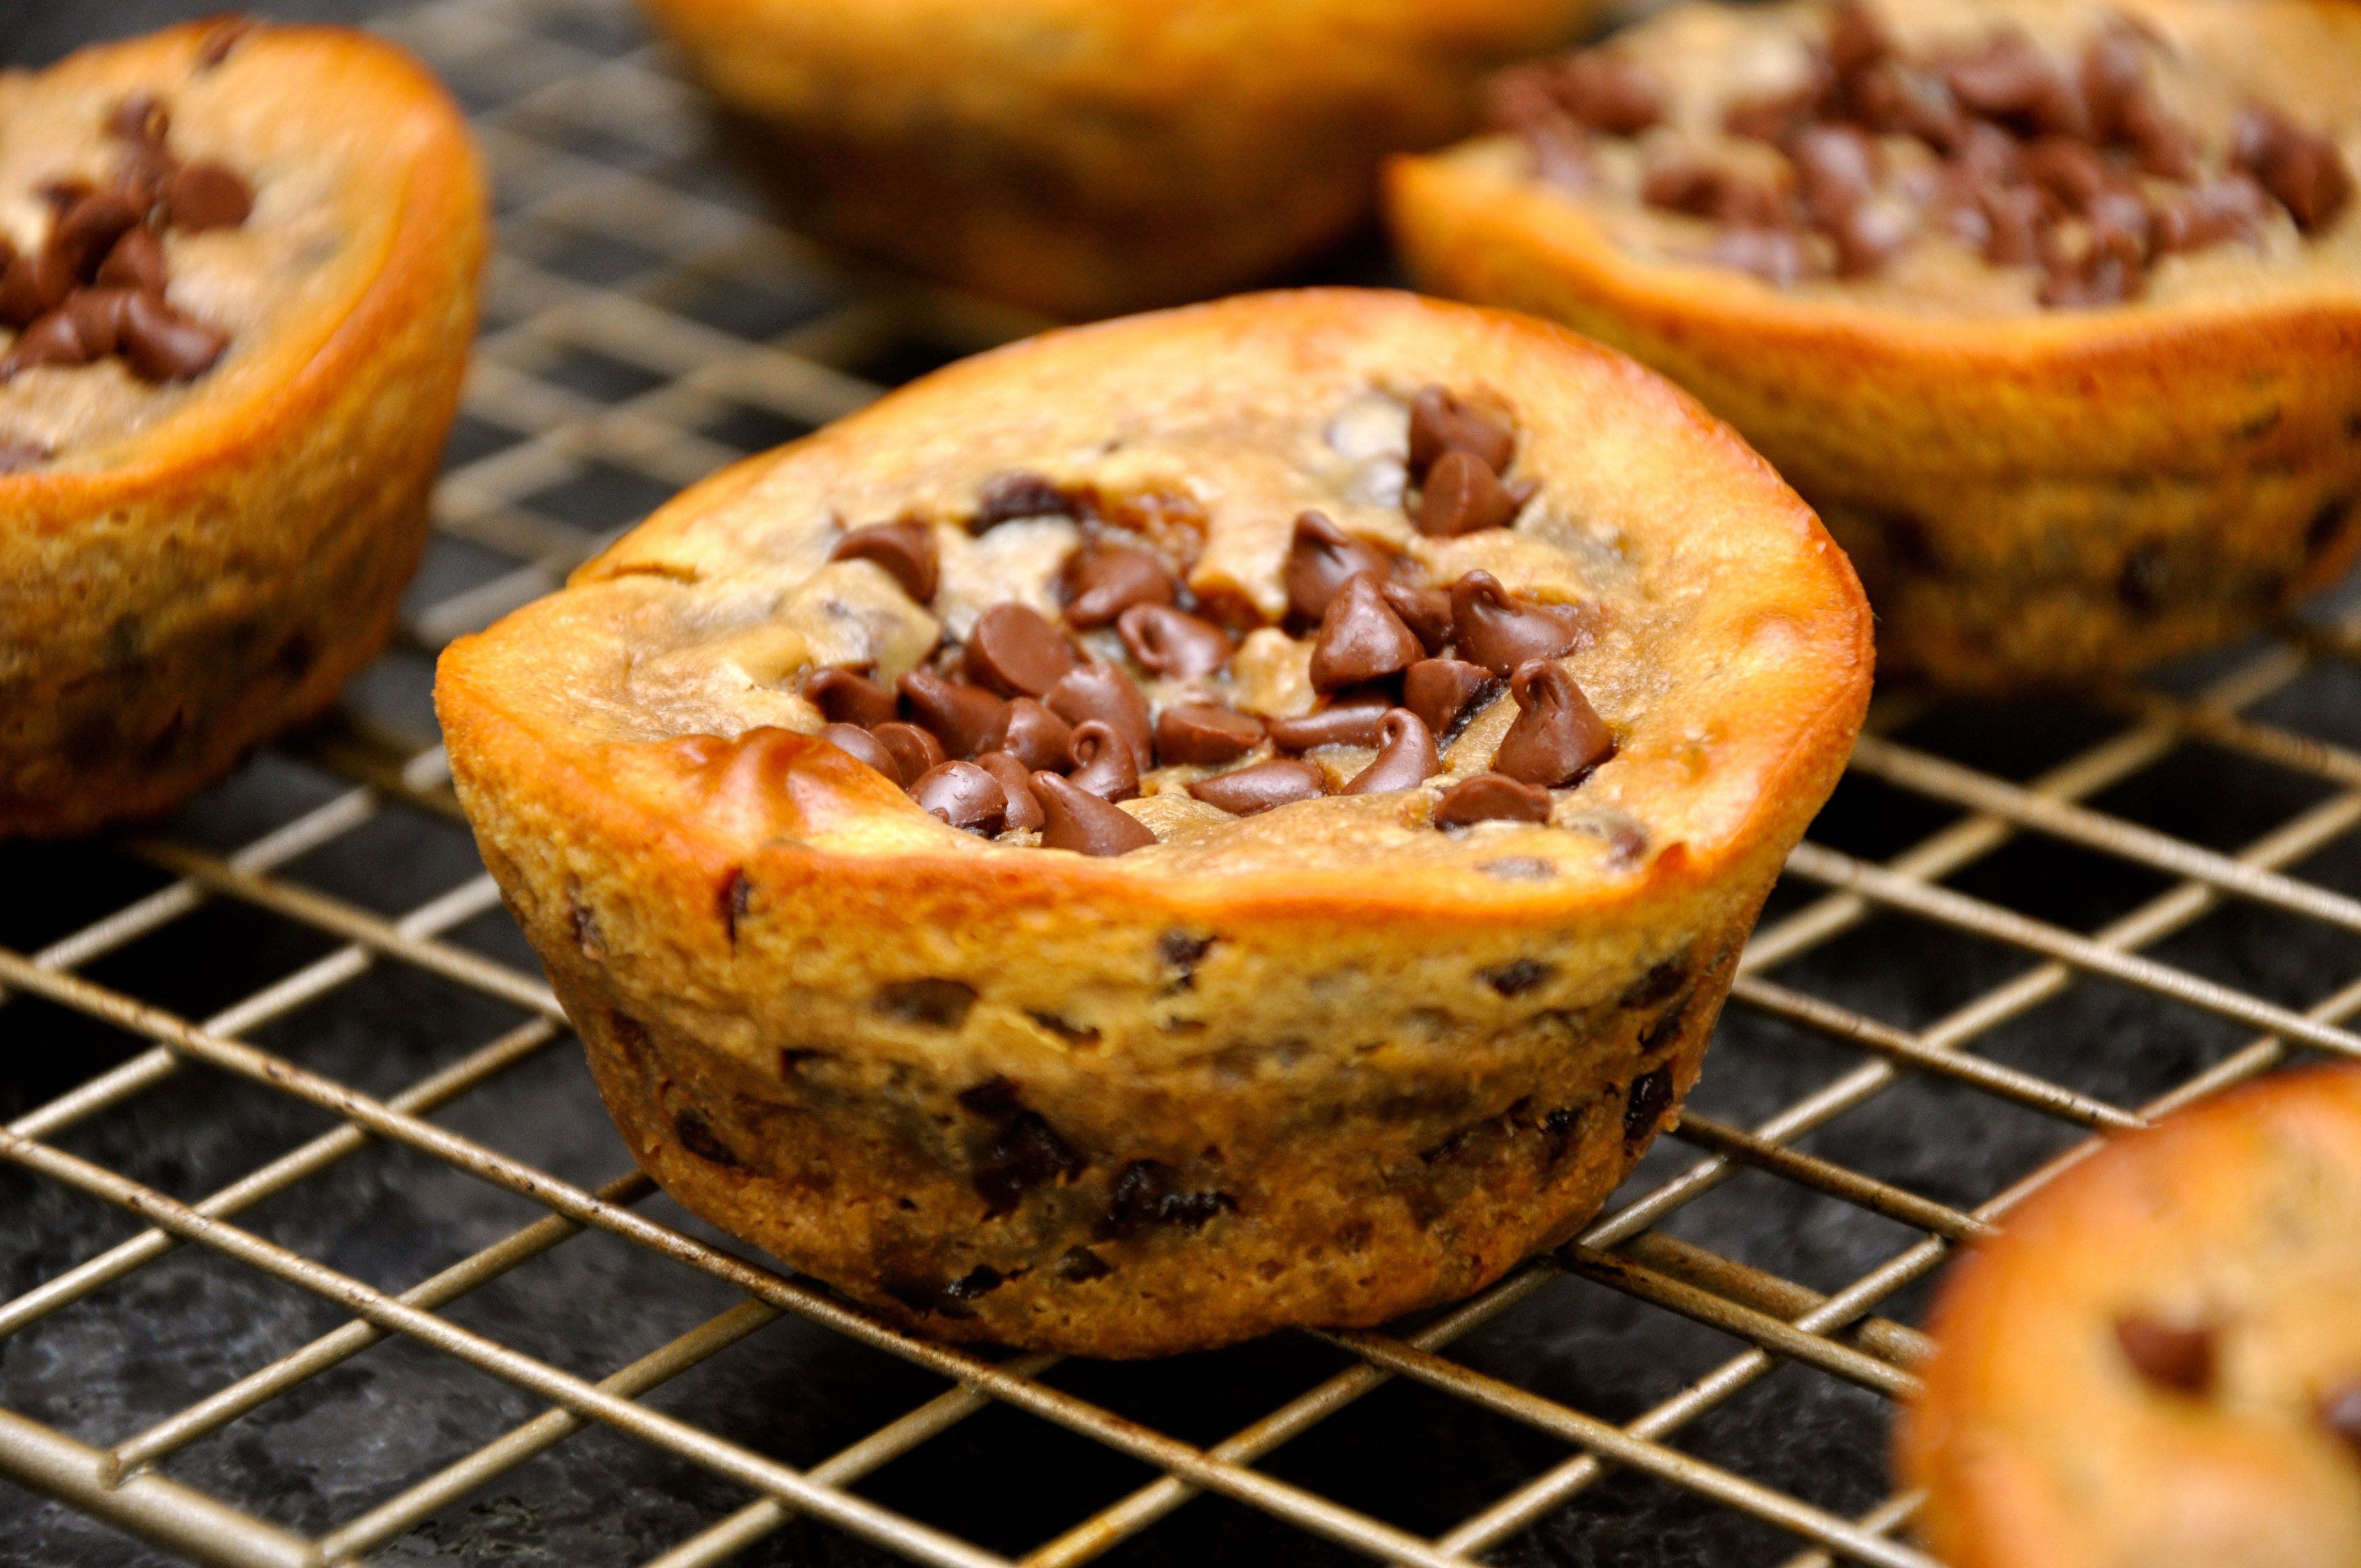
Still gooey, these are less messy and more contained than the classic sticky sandwich. If you like mint, you can use Andes Chocolate Mint Candy. The graham cracker crust is sweet like caramel. The melted chocolate forms a perfect pocket for the soft, gushy marshmallow, and the hardened chocolate on top is perfection.

These muffins are the next best thing if you cannot make them by the campfire, in green, for St. Patrick’s Day.

DSC_0439 DSC_0448

Shamrock S’more Muffins (makes 12)

1 ½ cups graham crackers, finely crushed (12 full sheets or 24 square crackers)
3/4 cup powdered sugar
1 cup and 2 tablespoons unsalted butter, melted
1 (4.4 oz) extra large milk chocolate bar, broken into rectangles (or 12 miniature milk chocolate bars or 1 xx oz package of Andes Mint Chocolate Candies)
12 large green marshmallows

Topping:
1 (4.4 oz) extra large milk chocolate bar, broken into rectangles

1. Preheat oven to 350°F. Grease muffin pan with cooking spray.
2. In a medium-size mixing bowl, combine graham cracker crumbs, powdered sugar and butter.
3. Evenly divide crumb mixture into each cup of a 12-cup muffin pan. Use your finger to press an indent into the center of each muffin cup.
4. Bake 7-10 minutes or until edges are bubbling. Pull out and immediately place one mini chocolate bar on each cup.
5. Place one marshmallow vertically in the center of each muffin and push it into the melted chocolate/graham cracker crust.
6. Return muffin pan to oven for 1-2 minutes or until marshmallows are slightly softened.
7. Place muffin pan on a cooling rack for 15 minutes before carefully removing cups from pan. After 5 minutes, gently press marshmallows to flatten them slightly.
8. Transfer muffins to cool completely on wire rack.
9. To prepare topping: place milk chocolate in a small bowl. Microwave on high for 1 minute-1 1/2 minutes or until melted and smooth, stirring every 30 seconds.
10. Dip the top of each marshmallow into the melted chocolate. Turn top-side up and let stand until set.

*Notes:
Store the cups in a single layer in an airtight container for up to one week.
Freezing is not recommended.

Bowl of Oatmeal Muffins

DSC_0411 DSC_0429

Who has time to cook the old-fashioned way? A pot of oatmeal is just as comforting in the form of a moist oaty muffin.

DSC_0446 DSC_0453 DSC_0452 DSC_0449

This gluten-free recipe requires a single bowl. Whisk and add the most common ingredients, just staples you may have in your pantry. Include whatever toppings you want to use up: dried fruits, nuts, blueberries, chocolate chips. Walnut, raspberry, and chocolate is an amazing flavor combination.

With these muffins you can have chocolate in the morning and still be hearty and healthy. Muffinize™ this old-fashioned breakfast and stock your freezer.

DSC_0458  DSC_0406

Bowl of Oatmeal Muffins (makes 18)

2 eggs
½ cup butter, melted and cooled
1 cup packed brown sugar
½ cup applesauce
1½ cups milk (skim or whichever percentage of fat you prefer)
2 tsp vanilla extract
½ tsp salt
1 Tbsp ground cinnamon
3 cups old-fashioned rolled oats
2 tsp baking powder
Optional: your favorite toppings (dried fruit, nuts, chocolate chips, etc.)

1. Preheat the oven to 350 degrees. Line a muffin tin with paper or paper/foil muffin liners.*
2. In a large bowl, whisk the eggs, butter, and brown sugar until sugar is dissolved. Add the applesauce, milk, vanilla, salt, and cinnamon. Whisk until well combined. Stir in the oats and baking powder.
3. Fill the muffin tin with ¼ cup of the oat mixture in each muffin cup. Add your favorite toppings. With a spoon, push the toppings down into the oat mixture.
4. Bake for 20-25 minutes. Let them cool completely in muffin pan before serving. Store in an airtight container or freeze in a zip top storage bag.

*Do not skip the muffin liners in this recipe.

Hamantaschen Muffins

DSC_0521

You might think it’s difficult to turn hamantaschen into muffins, but yes you can muffinize™ the traditional pastry that is served on the Jewish holiday of Purim.

The classic Purim cookie is a three-cornered cookie called “hamantaschen,” which means “Haman’s Pockets” in Yiddish.

The original filling was an Eastern European jam of prune or sweetened poppy seeds. In modern-day Tel Aviv and New York, hamantaschen has been modernized, with lemon, cherry, apricot, chocolate and amaretto.

Now, the cookie’s being transformed yet again. These muffins may be lacking the “three corners,” but they have pockets full of the taste of the original hamantaschen.

Experiment with different fillings, or go traditional.

Pictured below are cherry, apricot, chocolate-hazelnut, and prune-filled hamantaschen muffins.

DSC_0414 DSC_0415 DSC_0417 DSC_0420 DSC_0517 DSC_0522

Hamantaschen Muffins (makes 12)

2 2/3 cups flour
1/2 cup sugar
1/3 cup packed brown sugar
1 1/2 tsp baking powder
1/4 tsp baking soda
1/4 tsp ground nutmeg
3/4 tsp salt
1/4 cup butter, melted and cooled
1/4 cup vegetable oil
2 large eggs
1 1/2 tsp vanilla
1 cup milk

Topping:
4 Tbsp butter, melted
1/3 cup sugar
12 oz jar jelly, jam or preserves

1. Preheat oven to 425 F. Grease muffin pan with cooking spray or line with paper liners.
2. In a large mixing bowl, whisk flour, sugars, baking powder, baking soda, nutmeg and salt.
3. In a separate mixing bowl, whisk butter, oil, eggs, vanilla and milk.
4. Pour wet ingredients over dry mixture and stir until thoroughly combined.
5. Bake for 15 minutes, until muffins are golden and tops spring back when touched lightly.
6. Let muffins cool for 15 minutes, then use a cupcake corer or knife to cut a hole in the top of each.
7. Dip each muffin in melted butter, then sugar.
8. Fill each hole with jelly.
9. Dip cut-outs from muffins into leftover melted butter and sugar (optional).


Red Velvet Cream Cheese Muffins

DSC_0434

A red carpet delicacy, these cream cheese muffins are a muffinized™ Red Velvet cake, perfect for watching the Academy Awards (tonight). The color is rich and red, thanks to the beet powder, which is undetectable by taste.

The cream cheese swirled into the batter adds a subtle tang and provides extra moisture. The crumb topping is sweet, sandy, and slightly crunchy – it’s difficult not to pick off each crumb one by one!

DSC_0422

Red Velvet Cream Cheese Muffins (makes 12)

Crumb Topping*
1/2 cup sugar
1/4 cup all-purpose flour
5 Tbsp unsalted butter, diced into cubes
*recipe yields extra crumb topping

Cream Cheese Mixture
4 ounces brick-style cream cheese, softened
1/4 cup sugar
1/2 tsp vanilla extract

Muffins
1 1/4 cups all-purpose flour
1/2 cup sugar
2 tsp baking powder
1/2 tsp salt, or to taste
1 large egg
1/2 cup canola or vegetable oil
1/3 cup buttermilk
2 Tbsp natural unsweetened cocoa powder
4 tsp beet powder (or 2 tsp red liquid natural food coloring)

1. Preheat oven to 375 F. Spray muffin pan with cooking spray.
2. Crumb Topping– In a medium mixing bowl, add the sugar and flour. Use two forks or a pastry cutter to cut in the butter until you have coarse crumbs; set aside.
3. Cream Cheese Mixture– In a separate medium mixing bowl, combine the cream cheese, sugar, vanilla, and beat with a handheld electric mixer until smooth, or whisk by hand until smooth; set aside.
4. Muffins– In a large mixing bowl, whisk together the flour, sugar, baking powder, and salt; set aside.
5. In a separate medium mixing bowl, whisk together the egg, oil, buttermilk, cocoa powder, and beet powder.
6. Add the wet ingredients to the dry and stir just until moistened. (Do not overmix. Batter is thick and lumpy.)
7. Fold the cream cheese mixture into the muffin batter, being careful not to overmix. Some streaks of cream cheese should remain.
8. With an ice cream scoop, spoon batter into muffin pan, filling each cavity to two-thirds full. (Do not overfill. If cavities are too full, the crumb topping will spill onto muffin pan).
9. Evenly sprinkle each muffin with the crumb topping.
10. Bake for about 17 to 19 minutes, or until a knife inserted in the center of a muffin comes out clean. Allow muffins to cool in pan for 5 minutes before transferring to a wire cooling rack to cool completely.

*Notes:
Muffins will keep airtight at room temperature for up to 3 days, or in the freezer for up to 4 months.


Nutella-Stuffed Cinnamon Sugar Muffins

DSC_0438 DSC_0457

There is a burst of chocolate in every bite of these tall, domed muffins with beautiful crackled tops. The batter is laced with cinnamon and nutmeg and stuffed with Nutella. Fresh-out of the oven, the muffins are dunked into butter so that every crevice is coated with a sprinkling of cinnamon sugar. The finished product has the fluffiness of a donut but the soul of a muffin.

Nutella was invented during the 1940s when cocoa was in short supply. An Italian pastry baker used hazelnuts to enhance the chocolate he had in his bakery. Mixed with hazelnut, a family could use a jar of spreadable chocolate for many weeks. Nutella owner, Michele Ferrero, sometimes referred to as a real-life Willy Wonka, died last Saturday (yes, Valentine’s Day) at the age of 89.

This recipe is a keeper not only because it’s scrumptious, but also because its ingredients are mixed in a single bowl. So get out your (one) bowl and start baking.

DSC_0463 DSC_0485  DSC_0451 DSC_0461

Nutella-Stuffed Cinnamon Muffins (makes 8)

6 Tbsp unsalted butter, melted and cooled
1/2 cup sugar
1 large egg
1 tsp vanilla extract
1/2 cup milk (cow, almond, soy)
¾ cup all-purpose flour
¾ cup whole wheat flour
1 and 1/2 tsp baking powder
1/2 tsp ground cinnamon
1/4 tsp ground nutmeg
1/2 tsp salt
8 tsp Nutella

Cinnamon-Sugar Topping

1/4 cup sugar
2 tsp cinnamon
3 Tbsp unsalted butter

1. Preheat oven to 425 F. Grease muffin pan with cooking spray.
2. In a large bowl mix together the butter and sugar. Mix in the egg, vanilla extract, and milk.
3. Gently stir in flour, baking powder, cinnamon, nutmeg, and salt. (Do not overmix – stir until just combined).
4. Into each muffin cup, spoon 1 heaping Tablespoon of batter. Then, add 1 teaspoon of Nutella in the center, and spoon another heaping Tablespoon of batter on top. (If the muffin tins are completely full, that is ok. They will not overflow.)
5. Fill the empty muffin tins halfway with water for even baking.
6. Bake at 425 F for 5 minutes. Keeping the muffins in the oven, reduce temperature to 350 F and bake for an additional 12-15 minutes until batter is set.
7. Allow muffins to cool for about 5 minutes.
8. While the muffins are cooling, make the cinnamon-sugar topping: Melt the butter for about 30-60 seconds in the microwave. In a separate small bowl, stir together the sugar and cinnamon.
9. Dip the top of each muffin into the melted butter and then dip into the cinnamon-sugar mixture (swirl them around to ensure they are thickly coated). Set muffins upright on a wire cooling rack.

*Notes:

-Muffins stay fresh for up to one week in an airtight container.
-Muffins freeze well, up to 3 months.
-Thaw overnight in the refrigerator, then bring them to room temperature before serving in the morning. Or, zap frozen muffins in the microwave (10-15 seconds).


Strawberry, Banana & Nutella Muffins

DSC_0407 DSC_0437

If you like Nutella, here’s a delicious fusion of the chocolate-hazelnut spread with strawberries and banana.

The spread was invented during the 1940s when cocoa was in short supply. An Italian pastry baker used hazelnuts to enhance the chocolate he had in his bakery. Mixed with hazelnut, a family could use a jar of spreadable chocolate for many weeks. Nutella owner, Michele Ferrero, sometimes referred to as a real-life Willy Wonka, died last Saturday (yes, Valentine’s Day) at the age of 89.

These crumbly muffins are a muffinized™ version of the crepe filled with chocolate, sliced banana, and fresh-cut strawberries.

The bananas and strawberries add vitamins and fiber to the classic Nutella sandwich on white bread, which kids in Holland and Israel love to eat for lunch.

DSC_0442 DSC_0428 DSC_0421 DSC_0424

Strawberry, Banana & Nutella Muffins (makes 18-20)

3 cups flour
1 tsp salt
1 Tbsp + 1 tsp baking powder
1 cup sugar
½ cup canola oil
2 large eggs
2 tsp vanilla extract
1 cup buttermilk (If you don’t have buttermilk on hand, pour 1 Tbsp of vinegar into a measuring cup, add 1 cup of milk and let sit for 5 minutes.)
1½ cups fresh strawberries, chopped/diced
2 ripe (but not mushy) bananas, sliced thin
½ cup (more or less) Nutella

Topping:
1 Tbsp turbinado sugar
1 Tbsp Nutella

1. Preheat oven to 350 F degrees. Grease muffin pan with cooking spray.
2. In a medium bowl, whisk together the flour, salt, baking powder, and sugar. Set aside.
3. In a large bowl, whisk together oil, eggs and vanilla.
4. Gently fold in the flour mixture in three parts, alternating with the buttermilk. NOTE: DO NOT overmix! Mix only until all the flour has been incorporated and the majority of lumps are gone.
5. Gently fold in the strawberries.
6. Spoon some batter into each cup, about 2 tablespoons.
7. Place two banana slices at the bottom of each liner.
8. Spoon or pipe ½ Tbsp or so of Nutella over the banana slices. NOTE: You may put Nutella in a ziploc sandwich bag, cut the tip and squeeze it over the banana (much easier than spooning).
9. Fill each muffin cup with the remaining batter to ⅔ full, making sure to get strawberries in each cup.
10. Top each muffin with a generous sprinkling of sugar and drizzle some Nutella on top.
11. Bake muffins for 20-22 minutes or until a toothpick inserted into a muffin comes out clean.
12. Let cool in pan for 4-5 minutes before removing to a wire rack to cool completely.

NOTE: If you want to eat these warm, you can, but I suggest letting the muffins cool for at least 30 minutes so the Nutella has time to set.


Valentine S’more Muffins

DSC_0415 DSC_0428 DSC_0422 DSC_0419

If you’re a Valentine’s Day hater, let me apologize now. Today, I’m going to perpetuate the hype and share s’more.

These s’more muffins are pretty in pink and just as delicious as they look.

S’mores (the Girl Scout concoction of roasted marshmallow with melted chocolate sandwiched between two pieces of graham crackers) is one part of camping you can re-create in your kitchen without the packing, unpacking, and mosquitoes!

Still gooey, these are less messy and more contained than the classic sticky sandwich.

These muffins are the next best thing if you cannot make them by the campfire, in pink, for Valentine’s Day.

DSC_0442 (1) DSC_0442 DSC_0407 DSC_0429

Valentine S’more Muffins (makes 12)

1 ½ cups graham crackers, finely crushed (12 full sheets or 24 square crackers)
3/4 cup powdered sugar
1 cup and 2 tablespoons unsalted butter, melted
1 (4.4 oz) extra large milk chocolate bar, broken into rectangles (or 12 miniature milk chocolate bars)
12 large pink marshmallows (or heart shaped)

Topping:
1 (4.4 oz) extra large milk chocolate bar, broken into rectangles
1. Preheat oven to 350°F. Grease muffin pan with cooking spray.
2. In a medium-size mixing bowl, combine graham cracker crumbs, powdered sugar and butter.
3. Evenly divide crumb mixture into each cup of a 12-cup muffin pan. Use your finger to press an indent into the center of each muffin cup.
4. Bake 7-10 minutes or until edges are bubbling. Pull out and immediately place one mini chocolate bar on each cup.
5. Place one marshmallow vertically in the center of each muffin and push it into the melted chocolate/graham cracker crust.
6. Return muffin pan to oven for 1-2 minutes or until marshmallows are slightly softened.
7. Place muffin pan on a cooling rack for 15 minutes before carefully removing cups from pan. After 5 minutes, gently press marshmallows to flatten them slightly.
8. Transfer muffins to cool completely on wire rack.
9. To prepare topping: place milk chocolate in a small bowl. Microwave on high for 1 minute-1 1/2 minutes or until melted and smooth, stirring every 30 seconds.
10. Dip the top of each marshmallow into the melted chocolate. Turn top-side up and let stand until set.

*Notes:
Store the cups in a single layer in an airtight container for up to 1 week.
Freezing is not recommended.

If You Give Your Love a Muffin

This article was featured in Real Woman on February 12, 2015.

FullSizeRender

The idea of Valentine’s Day makes me blanch. We all love love, but some of us are perplexed by the popularity of a national holiday that leaves singles bitter, promotes the exchange of tacky gifts, and encourages children to trade “statements of love.” I, for one, resent the pressure on couples, young and old, to indulge in prix fixe meals that they would not otherwise stomach.

I feel so strongly about it that when my older son was 3, I took a stand. His preschool teachers told parents to pack a dozen personalized valentines to give out on the Day of Love. Like most 3-year-olds, my child could not yet write his name, so the task was clearly intended for the parents to transliterate scribbles on cards.

I did not enjoy the homework assignment, nor did I appreciate the expectation placed on my preschooler to send so-called-love-notes to children who could not yet read.

So I complained.

The director of the preschool rescinded the “assignment,” and the mothers went wild with disapproval. The Chicago moms had no clue that I was the culprit (until now).

Regardless of that year’s freedom from insincere Hallmark greetings, I’m still baffled by how second nature it is for today’s youth to swap cheesy Sponge Bob and Spider-Man valentines and for grown men to scurry off to grab the remnants of red roses at the grocery store. I do wonder what I’m missing.

But since it feels cynical to shut out the best thing we humans do on Earth (love), I share this recipe, for Valentine’s Day, straight from my heart.

DSC_0078

Cream Cheese Chocolate Muffins (makes 18)

1 1/2 cups all-purpose flour
1 cup sugar
1/4 cup baking cocoa
1 tsp baking soda
1/2 tsp salt
1 cup water
1/3 cup canola oil
1 Tbsp white vinegar
1 tsp vanilla

Filling
1 cup (8oz.) cream cheese, softened
1/3 cup sugar
1 egg
1/8 tsp salt
2 cups chocolate chips (or 1 cup chocolate chips and 1 cup peanut butter chips)

1. Preheat oven to 350 degrees. Grease muffin cups with cooking spray, or line with paper liners.
2. In a large bowl, combine flour, sugar, cocoa, baking soda, and salt. Add water, oil, vinegar, and vanilla. Mix well.
3. For the filling: In a separate mixing bowl, combine cream cheese, sugar, egg, salt, and chocolate chips. Mix well.
4. Use an ice cream scoop to spoon batter into muffin cups until half full.
5. Top each muffin cup with 2 Tbsp of filling.
6. Bake for 25 to 30 minutes.
7. Cool for 10 minutes before removing from pan to place on a wire cooling rack.

* Pair these muffins with a bottle of wine for a true Valentine’s Day


Cream Cheese Chocolate Muffins

DSC_0054 DSC_0056 DSC_0057 DSC_0064 DSC_0066 DSC_0070 DSC_0077 DSC_0078

Rich, creamy, and decadent, these muffins look heavenly and make a perfect dinner party dessert. The chocolate is fudgy and rich. The cream cheese filling makes a creamy, chewy kind of sink-hole for the crunchy chocolate chips.

Chances are you may already have the ingredients for this recipe, which is easy to whip up last minute and only requires two mixing bowls. These are impressive for a bake sale, charity, or dinner party.

DSC_0080 DSC_0082 DSC_0083 DSC_0086 DSC_0079 DSC_0080

Cream Cheese Chocolate Muffins (makes 18)

1 1/2 cups all-purpose flour
1 cup sugar
1/4 cup baking cocoa
1 tsp baking soda
1/2 tsp salt
1 cup water
1/3 cup canola oil
1 Tbsp white vinegar
1 tsp vanilla

Filling

1 cup (8oz.) cream cheese, softened
1/3 cup sugar
1 egg
1/8 tsp salt
2 cups chocolate chips (or 1 cup chocolate chips and 1 cup peanut butter chips)

1. Preheat oven to 350 degrees. Grease muffin cups with cooking spray, or line with paper liners.
2. In a large bowl, combine flour, sugar, cocoa, baking soda, and salt. Add water, oil, vinegar, and vanilla. Mix well.
3. For the Filling: In a separate mixing bowl, combine cream cheese, sugar, egg, salt, and chocolate chips. Mix well.
4. Use an ice cream scoop to spoon batter into muffin cups until half full.
5. Top each muffin cup with 2 Tbsp of Filling.
6. Bake for 25 to 30 minutes.
7. Cool for 10 minutes before removing from pan to place on a wire cooling rack.

Flourless Peanut Butter Chocolate Chip Muffins

DSC_0413 DSC_0412

OK gluten-free lovers, here’s to satisfying your sweet tooth!

These are the fluffiest, most moist baked products on the global gluten-free menu. The texture is reminiscent of peanut butter fudge. They are more cakey than the usual muffin. The peanut butter does not overwhelm, and the banana flavor is barely detected, albeit the riper the banana the sweeter the muffin. The melty chocolate chips complement the peanut butter in every bite.

Let’s talk all the things these muffins are not. They are gluten-free, grain-free, soy-free, dairy-free, oil-free, and refined sugar-free. So how could they be good?

Trust, but verify.

With the help of a blender, the batter is transformed in minutes into the best excuse for eating chocolate for breakfast.

DSC_0436 DSC_0427 DSC_0425 DSC_0423

Flourless Peanut Butter Chocolate Chip Muffins (makes 12)

2 medium ripe bananas, peeled
2 large eggs
1 heaping cup creamy peanut butter
6 Tbsp honey (or agave or maple syrup)
2 Tbsp vanilla extract
1/2 tsp baking soda
pinch salt, optional and to taste
1 heaping cup mini semi-sweet chocolate chips
1 Tbsp mini semi-sweet chocolate chips (for sprinkling)

1. Preheat oven to 400 F. Grease muffin pan with cooking spray.
2. To the canister of a blender, add bananas, eggs, peanut butter, honey, vanilla extract, baking soda, and salt. Blend on high speed until smooth and creamy, about 1 minute.
3. Transfer batter to a mixing bowl. Fold in heaping cup of chocolate chips and stir.
4. Use an ice cream scoop to distribute batter into muffin cups to ¾ full.
5. Sprinkle each muffin cup with mini chocolate chips.
6. Bake for 13 to 18 minutes*, or until the tops are set, domed, springy to the touch, and a toothpick inserted into the center comes out clean, or with a few moist crumbs, but no batter.
7. Allow muffins to cool in pan for 10 minutes until they’ve set.**

*Watch muffins closely and bake until done.
**These muffins will keep airtight at room temperature for up to 5 days, or in the freezer for up to 4 months.